Manage content pages
The content of pages like Terms of Use, support, privacy statements etc can be managed through the admin console (/admin).
Adding a new page
Go to the content pages section:
- Login into the admin console.
- Go to configuration
- Go to Content Pages
- Click on the + icon.
Content page name
A content page should have a unique, URL friendly name, e.g. terms-and-conditions. This name is used to retrieve the page from the database when the user visits the URL /personal/content/terms-and-conditions. Therefore you should only use lower case letters [a-z], numbers [0-9], underscore '_' or hyphens '-' and make sure the name has not been used for a different page.
The page name cannot be changed later, because that would lead to 404 - Not found errors.
Translations
A content page can be translated in multiple languages, except for the page name (URL). Currently English and Dutch are supported to enter into the database, other languages can be added later.
Landing page / Login Page
Two content pages can be used to maintain the text above and below the login box on the landing page:
- landingpage-top
- landingpage-bottom
The title of the landingpage-top will be used as title of the landingpage. The title of landingpage-bottom will not be printed.
The correct heading for the landingpage content is Heading 3
For the login page, you can create similar pages with the names
- login-top
- login-bottom
The login page is the page that is shown when the user logs in from a service. The landing page is the page when the user goes to the root of Onegini IDP directly.
Align images/video
To align an image or video left or right from the content, assign the class name "image-left" or "image-right" in the Stylesheet classes field under the Advanced tab. The editor will show the image above the content, but on the landingpage it will be floating left or right.
YouTube content
In YouTube choose share (delen) -> embed (insluiten).
- Choose the correct video size (width 280)
- Check the following boxes:
- Use HTTPS (HTTPS gebruiken)
- Enable privacy mode (privacymodus inschakelen)
- Toggle to source code mode in the rich text editor.
- Paste the iframe html snippet from YouTube
- Add class="image-left" or class="image-right" to make the video appear left of right from the other text
Examples
Example landingpage-top:
<p><img alt="" class="image-left" src="http://dev.onegini.me:8989/static/img/placeholders/placeholder.png" style="width: 281px; height: 158px; border-width: 0px; border-style: solid;" /></p>
<h3>How to use onegini</h3>
<ul>
<li>Step 1: we can have lots of fun</li>
<li>Step 2: there's so much we can do</li>
<li>Step 3: it's just you for me</li>
<li>Step 4: I can give you more</li>
<li>Step 5: don't you know that the time has arrived?</li>
</ul>
Current landingpage-top (with video):
<p>
Onegini is a new way of logging in you can use to access online services provided by companies like insurance agencies, financial companies and web stores. On onegini.me you can create and maintain your digital identity. <a href="https://test.onegini.me/personal/content/support">Read more...</a></p>
<p>
</p>
<p class="image-left" style="margin-right:100px;">
<iframe allowfullscreen="1" frameborder="0" height="158" src="https://www.youtube-nocookie.com/embed/ClJtjoGufng?rel=0" width="280"></iframe></p>
<h3>
Getting started</h3>
<ul>
<li>
Log in with an account from the list</li>
<li>
Create your digital identity </li>
<li>
Share your digital identity with your companies</li>
</ul>
<p>
</p>
Example landingpage-bottom:
<p><iframe allowfullscreen="1" class="image-right" frameborder="0" height="158" src="http://www.youtube-nocookie.com/embed/UF8lYgOYkKA" width="281"></iframe></p>
<h3>Tutorial SURFnet</h3>
<ul>
    <li>Go to a service for SURFconext</li>
    <li>Click on the login</li>
    <li>Choose onegini</li>
    <li>Choose your preferred social network</li>
    <li>Use the service</li>
</ul>
FAQ page
An FAQ page with questions that are shown and answers that are initially hidden can be maintained by adding a definition list to the content page.
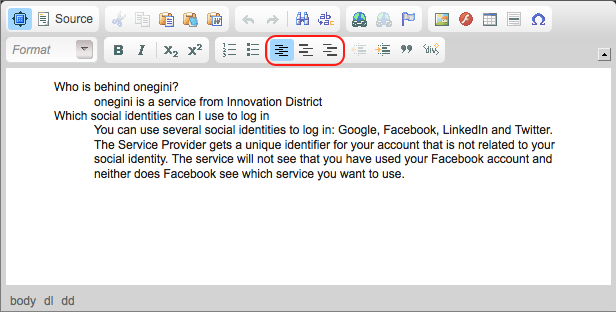
- First add a Definition List (the left button in the red box)
- For every question use a Definition Term (middle button)
- Every answer should go in the Definition Description (right button). A Definition Description can contain multiple paragraphs, but no lists.
The answers will be hidden in the content page until the visitor clicks on the question. If you add an anchor (the Flag button in the top row) to the question and link to that anchor, the answer will be visible when the FAQ page loads.
Linking to Content pages
The admin console is not a CMS. Links from Onegini IDP to the content pages must be manually added to the HTML templates.
Deleting a page
A content page can be deleted through the admin console. If you delete a page and the user visits its URL, the user will get a 404 - Not found error page.
Pages in Use
These pages are defined in the HTML templates and should be entered through the admin console:
- terms-of-use
- content-policy
- privacy
- support