Mobile authorization / authentication
Introduction
With mobile authentication the Onegini Mobile Platform offers a two vector authentication mechanism in a user friendly and secure way. Mobile authentication uses PGP to encrypt data send on top of secured http connections. By using two way PGP encryption the sender and receivers identity are proved. As a medium to send push messages for mobile authentication Google Cloud Messaging (GCM) is used. When integrating the Onegini Android SDK in an existing APP which is using an earlier generation push messaging called C2DM please migrate to GCM.
Enrollment
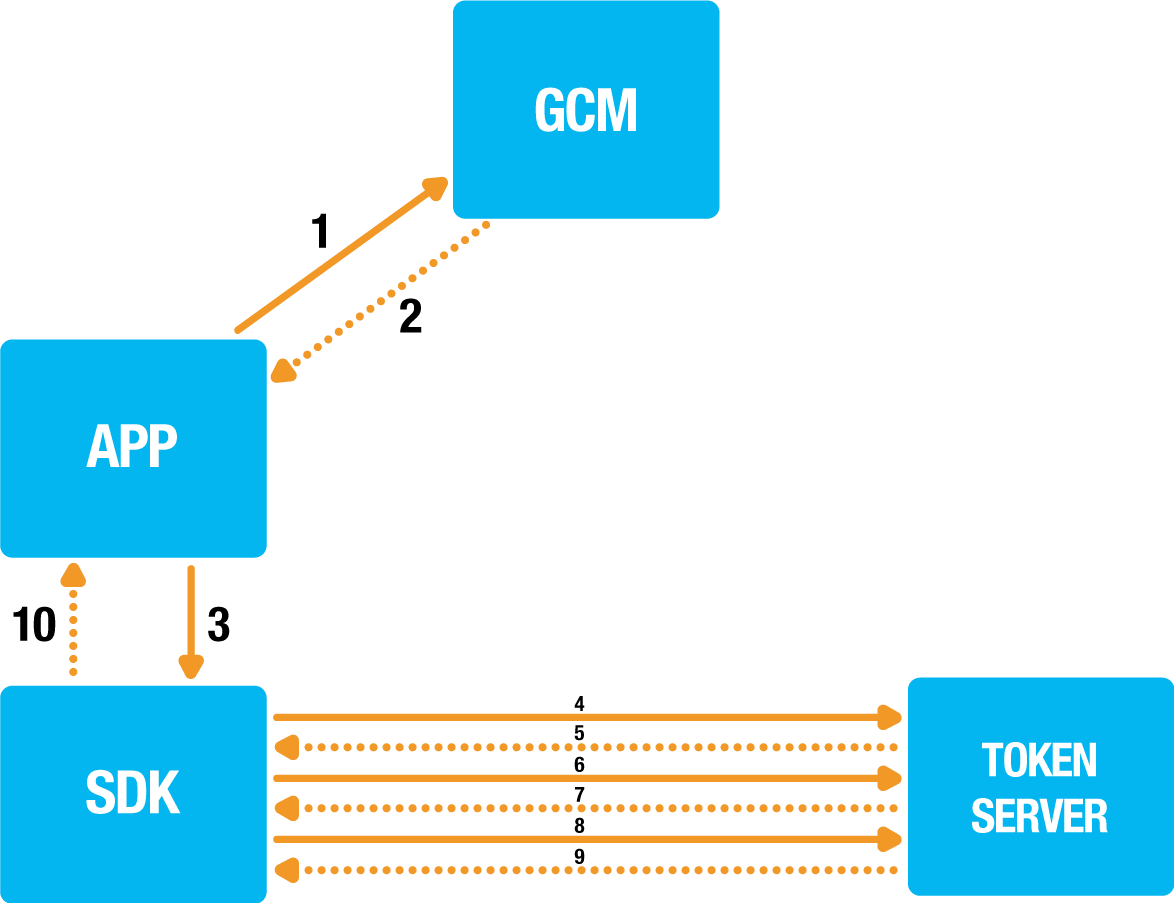
- APP → GCM: Receive the push token for the current application from the Google Cloud Messaging service.
- GCM → APP: The push token is returned.
- APP → SDK: Initialize mobile authorization enrollment and provide push token and handlers.
- SDK → Token Server: Initialize mobile authorization enrollment with push token / registration id, access token and platform.
- Token Server → SDK: When all input parameters successfully verified an identifier is returned for the enrollment transaction.
- SDK → Token Server: A RSA key pair is generated, the public key is send to the Token Server.
- Token Server → SDK: The Token Server will also generate a key pair and return its public key.
- SDK → Token Server: Acknowledge the token servers public key is received.
- Token Server → SDK: Acknowledge the enrollment process is completed.
- SDK → APP: Result of the enrollment flow is reported to the handler.
During the mobile authentication enrollment step the device is registered for mobile authentication. The app itself is responsible for handling all the GCM communication including fetching the push token. The reason why this responsibility is in the app is that one app can only have one registration id. This allows the app to support more push messaging features besides the mobile authentication provider by the SDK.
In order to use mobile authentication the device has to support Google Play Services. It's a responsibility of app's developer to check if push notifications are supported on the device. Once push notifications are available on the device the app should fetch the registration id, which is used as a push token during the mobile authentication enrollment. Please refer to the google documentation on how to obtain this registration id.
Example code to initialize mobile authentication enrollment for currently authenticated user
OneginiClient.getInstance().getUserClient().enrollUserForMobileAuthentication("myRegistrationId", new OneginiMobileAuthenticationEnrollmentHandler() {

  @Override
  void onSuccess() {
    // Method called when mobile authentication was successfully enrolled.
  }

  @Override
  void onError(OneginiMobileAuthenticationEnrollmentError error) {
    // Method called on mobile authentication enrollment error.
  }
);
Handling push notifications
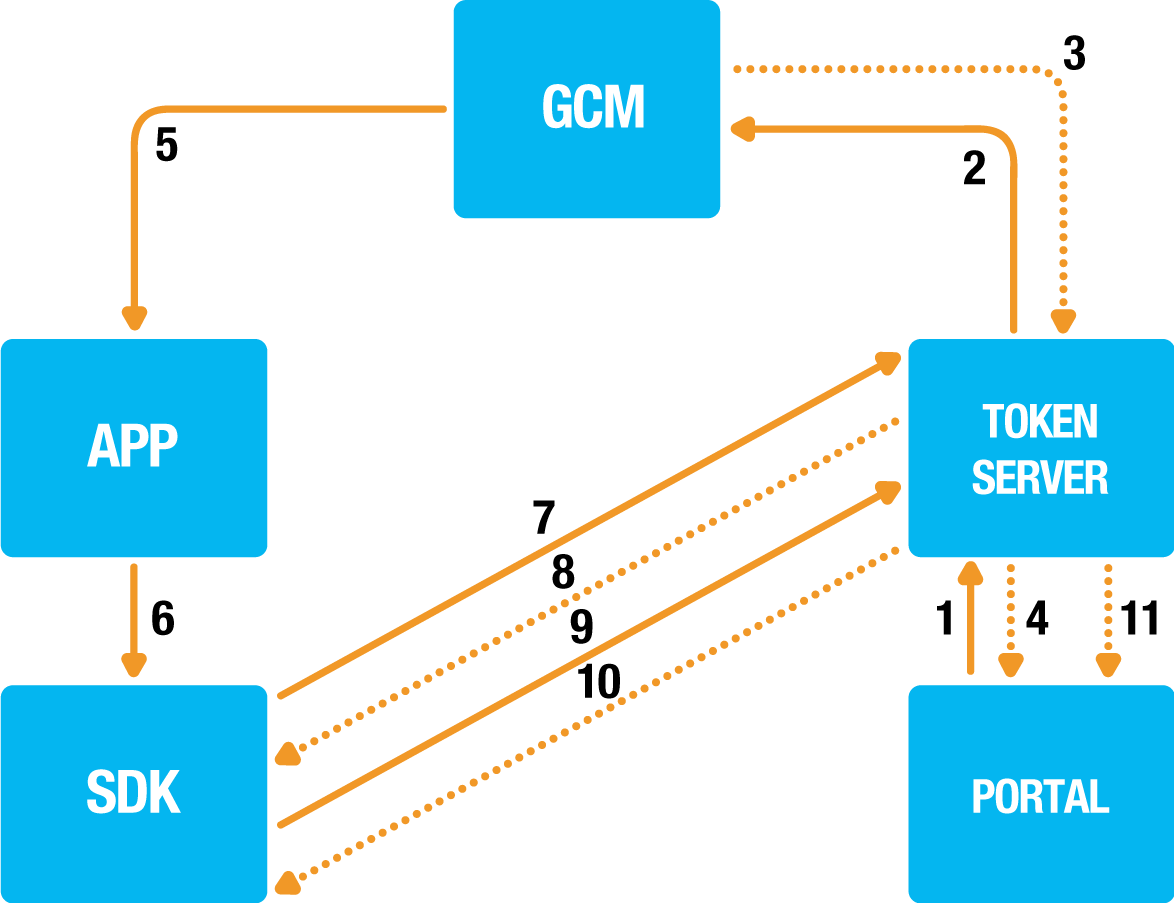
- Portal → Token Server: Initialize mobile authentication.
- Token Server → GCM: Send the unencrypted push notification with a transaction id and a non secured message.
- GCM → Token Server: Push notification delivery report.
- Token Server → Portal: Identifier of the initialized mobile authentication transaction.
- GCM → APP: Non-fragile push notification.
- APP → SDK: Delegate handling of the push notification to the SDK.
- SDK → Token Server: Fetch PGP encrypted and signed message from server.
- Token Server → SDK: Base64 encoded PGP encrypted and signed fragile authentication data.
- SDK → Token Server: The push message is verified and decrypted, the SDK starts a mobile authentication request that user will accept or not. The result is encrypted, signed and send to the Token Server.
- Token Server → SDK: If the push type used requires feedback on the result e.g. pin usage the result is communicated back to the SDK which will optionally perform a retry.
- Token Server → Portal: A callback is send to inform the portal about the mobile authentication result.
Push notifications are handled by the application that delegates the handling of the push notification to the SDK. The SDK will determine if it should do something with the push notification or not before handling it. This allows the app to support mutiple types of push notifications next to the mobile authentication push notification. You can trigger it with handleMobileAuthenticationRequest() on the UserClient instance.
public void handleMobileAuthenticationRequest(final Bundle pushMessage, final OneginiMobileAuthenticationHandler mobileAuthenticationHandler);
Then the SDK will use OneginiMobileAuthenticationHandler to perform the request and end in one of the two methods of
OneginiMobileAuthenticationHandler:
- Mobile Authentication was successful
void onSuccess();
- Mobile Authentication failed due to an
error
void onError(OneginiMobileAuthenticationError error);
Please note, that the user has an ability to deny incoming mobile authentication request. In such case the onError method will be called with an
ACTION_CANCELED error type.
Example code push notification handling
@Override
protected void onHandleIntent(final Intent intent) {
  final Bundle extras = intent.getExtras();
  if (!extras.isEmpty()) {
    OneginiSDK.getOneginiClient(this).getUserClient().handleMobileAuthenticationRequest(extras, new OneginiMobileAuthenticationHandler() {

        @Override
        public void onSuccess() {
          // Method called when mobile authentication request was successful.
        }

        @Override
        public void onError(final OneginiMobileAuthenticationError mobileAuthenticationError) {
          // Method called on mobile authentication error, for example when user denied the authentication
        }
    });
  }
  GcmBroadcastReceiver.completeWakefulIntent(intent);
}