Performing resource calls
- Introduction
- Using OkHttp 3 client with Retrofit 1.X and 2.X
- Fetching resource anonymously
- Fetching a resource on behalf of a user
- Fetching a resource on behalf of implicitly authenticated user
- Performing modified REST requests
Introduction
Starting from version 6.04.00 the Onegini SDK exposes instances of OkHttp 3 clients that are prepared for making secure resource calls to your backend. The instances are already pre configured and secured by the SDK, so that you do not need to worry about encrypting/decrypting the payload or certificate pinning. The client can be later on used with libraries like Retrofit 1.X and 2.X.
DeviceClient#getOkHttpClient()returns an instance of the OkHttpClient with security features like certificate pinning, but no user/device authentication.DeviceClient#getAnonymousResourceOkHttpClient()returns an instance of secured client that also uses device credentials for authentication.UserClient#getResourceOkHttpClient()returns an instance of secured client that also uses user's credentials for authentication.
Get resource flow
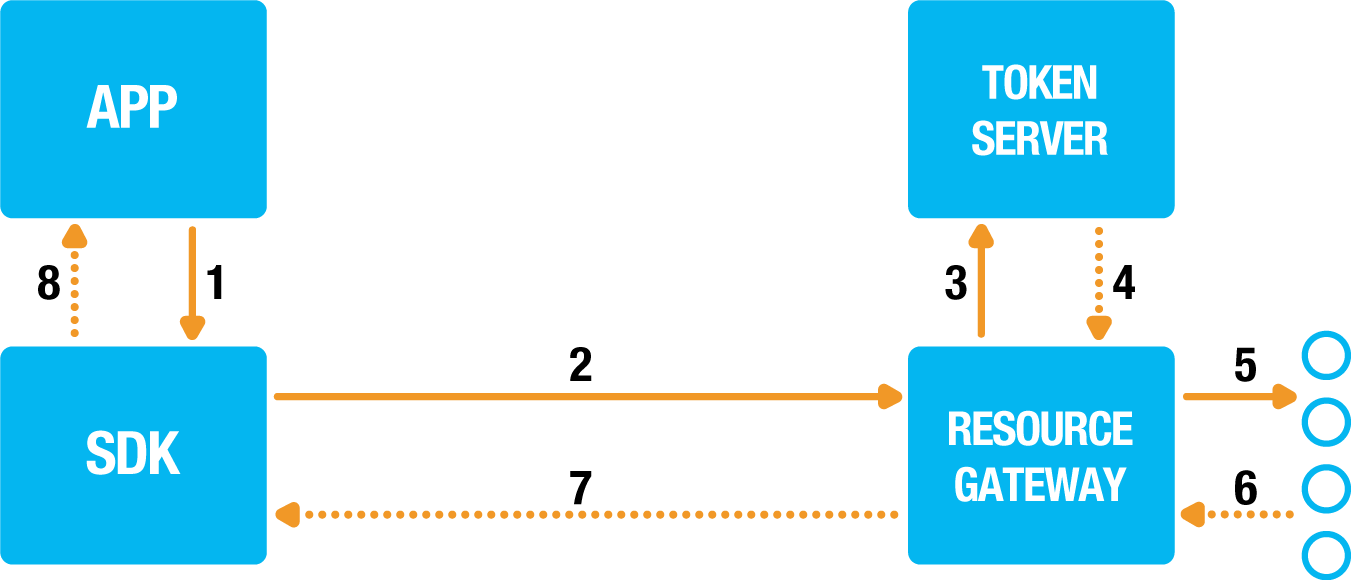
- APP → SDK: Build REST adapter based secured client provided by the SDK.
- SDK → Resource Gateway: Request a resource at the resource gateway.
- Resource Gateway → Token Server: Validate the provided token.
- Token Server → Resource Gateway: Details regarding the access token like scope and user, which will be verified by the resource gateway.
- Resource Gateway → Resource Server: Get the resource.
- Resource Server → Resource Gateway: Return the resource.
- Resource Gateway → App: Return the resource.
Using OkHttp 3 client with Retrofit 1.X and 2.X
The OkHttp 3 clients that are returned by the SDK (DeviceClient#getOkHttpClient(), DeviceClient#getAnonymousResourceOkHttpClient(),
UserClient#getResourceOkHttpClient(), UserClient#getImplicitResourceOkHttpClient(), DeviceClient#getUnauthenticatedResourceOkHttpClient()) can be used
with both Retrofit 1.X and 2.X.
In Retrofit 2.X the Retrofit.Builder() expects that an instance of the OkHttpClient will be provided with the client method:
private static <T> T prepareSecuredRetrofitClient(final Class<T> clazz, final Context context, final OkHttpClient okHttpClient) {
  final OneginiClient oneginiClient = OneginiSDK.getOneginiClient(context);
  final Retrofit retrofit = new Retrofit.Builder()
    .client(okHttpClient)
    // ...
    .build();

  return retrofit.create(clazz);
}
In Retrofit 1.X you need to use additional dependency called retrofit1-okhttp3-client. Then the client can be set with:
private static <T> T prepareSecuredRetrofitClient(final Class<T> clazz, final Context context, final OkHttpClient okHttpClient) {
  final OneginiClient oneginiClient = OneginiSDK.getOneginiClient(context);
  final RestAdapter restAdapter = new RestAdapter.Builder()
    .setClient(new Ok3Client(okHttpClient))
    // ...
    .build();
  return restAdapter.create(clazz);
}
We recommend using Retrofit 2.X which is currently supported version by it's creators. Therefore the following examples will only cover usage of Retrofit 2.X.
Fetching resource anonymously
A device can use it's OAuth credentials in order to obtain an Access Token object, which in turn can be used for proofing its authenticity. An anonymous resource call can be typically used in cases where a user does not need to login or register in order to use certain functionality, or access some resource.
Authenticate the device
The SDK gives you the flexibility of being in control over building the requests and handling the responses. Therefore, it is your responsibility to
perform device authentication with DeviceClient#authenticateDevice whenever the Resource Gateway responds with the 401 unauthorized status code.
Once the device has been authenticated using DeviceClient#authenticateDevice method, it is possible to start fetching resources.
Example code for authenticating the device
private void authenticateDevice() {
  authenticatedUserProfile = OneginiSDK.getOneginiClient(this).getUserClient().getAuthenticatedUserProfile();
  OneginiSDK.getOneginiClient(this).getDeviceClient()
      .authenticateDevice(new String[]{ "application-details" }, new OneginiDeviceAuthenticationHandler() {
            @Override
            public void onSuccess() {
              callAnonymousResourceCallToFetchApplicationDetails();
            }

            @Override
            public void onError(final OneginiDeviceAuthenticationError error) {
              final @OneginiDeviceAuthenticationError.DeviceAuthenticationErrorType int errorType = error.getErrorType();
              if (errorType == OneginiDeviceAuthenticationError.DEVICE_DEREGISTERED) {
                onDeviceDeregistered();
              } else if (errorType == OneginiDeviceAuthenticationError.USER_DEREGISTERED) {
                onUserDeregistered(authenticatedUserProfile);
              } else {
                displayError(error);
              }
            }
          }
      );
}
Defining the REST interface
The first step we need to take in order to fetch resources anonymously is to define a REST interface. Please note that the path application-details is
relative to the endpoint which we need to configure on the HTTP client before making a call. Please follow one of many Retrofit tutorials for details.
import com.onegini.mobile.exampleapp.model.ApplicationDetails;
import retrofit2.http.GET;
import io.reactivex.Single;

public interface AnonymousClient {

  @GET("application-details")
  Single<ApplicationDetails> getApplicationDetails();
}
Defining the REST Adapter
Next, we need to setup the Retrofit instance by providing the anonymousClient (DeviceClient#getAnonymousResourceOkHttpClient()), Resource Gateway url and
also REST interface which we have defined in the previous step.
Example code
import android.content.Context;
import com.onegini.mobile.exampleapp.model.ApplicationDetails;
import com.onegini.mobile.exampleapp.network.client.AnonymousClient;
import com.onegini.mobile.exampleapp.network.client.SecureResourceClient;
import io.reactivex.Single;
import io.reactivex.android.schedulers.AndroidSchedulers;
import io.reactivex.schedulers.Schedulers;

public class AnonymousService {

  private static AnonymousService INSTANCE;

  public static AnonymousService getInstance(final Context context) {
    if (INSTANCE == null) {
      INSTANCE = new AnonymousService(context);
    }
    return INSTANCE;
  }

  private final AnonymousClient applicationDetailsRetrofitClient;

  private AnonymousService(final Context context) {
    applicationDetailsRetrofitClient = SecureResourceClient.prepareSecuredAnonymousRetrofitClient(AnonymousClient.class, context);
  }

  public Single<ApplicationDetails> getApplicationDetails() {
    return applicationDetailsRetrofitClient.getApplicationDetails()
        .subscribeOn(Schedulers.io())
        .observeOn(AndroidSchedulers.mainThread())
  }
}
import android.content.Context;
import com.onegini.mobile.exampleapp.OneginiSDK;
import com.onegini.mobile.sdk.android.client.OneginiClient;
import okhttp3.OkHttpClient;
import retrofit2.Retrofit;
import retrofit2.adapter.rxjava.RxJava2CallAdapterFactory;
import retrofit2.converter.gson.GsonConverterFactory;

public class SecureResourceClient {

  public static <T> T prepareSecuredAnonymousRetrofitClient(final Class<T> clazz, final Context context) {
    final OkHttpClient okHttpClient = OneginiSDK.getOneginiClient(context).getDeviceClient().getAnonymousResourceOkHttpClient();
    return prepareSecuredRetrofitClient(clazz, context, okHttpClient);
  }

  private static <T> T prepareSecuredRetrofitClient(final Class<T> clazz, final Context context, final OkHttpClient okHttpClient) {
    final OneginiClient oneginiClient = OneginiSDK.getOneginiClient(context);
    final Retrofit retrofit = new Retrofit.Builder()
        .client(okHttpClient)
        .baseUrl(oneginiClient.getConfigModel().getResourceBaseUrl())
        .addConverterFactory(GsonConverterFactory.create())
        .addCallAdapterFactory(RxJava2CallAdapterFactory.create())
        .build();

    return retrofit.create(clazz);
  }
}
As you can see in the snippets above, the Resource Gateway url (endpoint) is set explicitly on Retrofit.Builder. Depending on
your needs you may set additional options, for example add a Gson converter or a RxJava2CallAdapterFactory like in the example above. Please notice that the
client passed to the builder has to come from DeviceClient#getAnonymousResourceOkHttpClient() as we want to make anonymous resource call.
Performing the anonymous resource call
When we have the Retrofit client defined and instantiated we can proceed and perform the resource call itself. The SDK will not process the response, which means that you need to handle it on our own. This also means that you need to make sure that the device has a valid access token by performing device authentication before making the actual anonymous resource call.
  private void authenticateDevice() {
    OneginiSDK.getOneginiClient(this).getDeviceClient()
        .authenticateDevice(new String[]{ "application-details" }, new OneginiDeviceAuthenticationHandler() {
              @Override
              public void onSuccess() {
                callAnonymousResourceCallToFetchApplicationDetails();
              }

              @Override
              public void onError(final OneginiDeviceAuthenticationError error) {
                final @OneginiDeviceAuthenticationError.DeviceAuthenticationErrorType int errorType = error.getErrorType();
                if (errorType == OneginiDeviceAuthenticationError.DEVICE_DEREGISTERED) {
                  onDeviceDeregistered();
                } else if (errorType == OneginiDeviceAuthenticationError.USER_DEREGISTERED) {
                  onUserDeregistered(authenticatedUserProfile);
                } else {
                  displayError(error);
                }
              }
        );
  }

  private void callAnonymousResourceCallToFetchApplicationDetails() {
    disposables.add(
            AnonymousService.getInstance(this)
                .getApplicationDetails()
                .subscribe(this::onApplicationDetailsFetched, throwable -> onApplicationDetailsFetchFailed())
        );
  }

  private void onApplicationDetailsFetched(final ApplicationDetails applicationDetails) {
    applicationDetailsTextView.setText(applicationDetails.getApplicationDetailsCombined());
  }

  private void onApplicationDetailsFetchFailed() {
    applicationDetailsTextView.setText("Application details fetch failed");
  }

  @Override
  public void onDestroy() {
    disposables.clear();
    super.onDestroy();
  }
Fetching a resource on behalf of a user
In order to request a resource for a specific user, the client needs to be registered and also the user's access token needs to be present within the
application memory. So it is required to have the authentication flow UserClient#authenticateUser finished successfully before a resource call on behalf of
user can be made. A resource request can be typically used in cases where usage of certain functionality or accessing resources requires user authentication.
Defining REST interface
The first step we need to take in order to fetch a resource is to define a REST interface. Please note that the path devices is relative to the endpoint which
we need to configure on the HTTP client before making a call. Please follow one of many Retrofit tutorials for details.
import com.onegini.mobile.exampleapp.network.response.DevicesResponse;
import retrofit2.http.GET;
import io.reactivex.Single;

public interface UserClient {

  @GET("devices")
  Single<DevicesResponse> getDevices();
}
Defining the REST Adapter
Next, we need to setup the retrofit instance by providing the resource client (UserClient#getResourceOkHttpClient()), Resource Gateway url and also REST
interface which we have defined in previous step.
Example code
import android.content.Context;
import com.onegini.mobile.exampleapp.network.client.SecureResourceClient;
import com.onegini.mobile.exampleapp.network.client.UserClient;
import com.onegini.mobile.exampleapp.network.response.DevicesResponse;
import io.reactivex.Single;
import io.reactivex.android.schedulers.AndroidSchedulers;
import io.reactivex.schedulers.Schedulers;

public class UserService {

  private static UserService INSTANCE;

  public static UserService getInstance(final Context context) {
    if (INSTANCE == null) {
      INSTANCE = new UserService(context);
    }
    return INSTANCE;
  }

  private final UserClient userRetrofitClient;

  private UserService(final Context context) {
    userRetrofitClient = SecureResourceClient.prepareSecuredUserRetrofitClient(UserClient.class, context);
  }

  public Single<DevicesResponse> getDevices() {
    return userRetrofitClient.getDevices()
        .subscribeOn(Schedulers.io())
        .observeOn(AndroidSchedulers.mainThread())
  }
}
import android.content.Context;
import com.onegini.mobile.exampleapp.OneginiSDK;
import com.onegini.mobile.sdk.android.client.OneginiClient;
import okhttp3.OkHttpClient;
import retrofit2.Retrofit;
import retrofit2.adapter.rxjava.RxJava2CallAdapterFactory;
import retrofit2.converter.gson.GsonConverterFactory;

public class SecureResourceClient {

  public static <T> T prepareSecuredUserRetrofitClient(final Class<T> clazz, final Context context) {
    final OkHttpClient okHttpClient = OneginiSDK.getOneginiClient(context).getUserClient().getResourceOkHttpClient();
    return prepareSecuredRetrofitClient(clazz, context, okHttpClient);
  }

  private static <T> T prepareSecuredRetrofitClient(final Class<T> clazz, final Context context, final OkHttpClient okHttpClient) {
    final OneginiClient oneginiClient = OneginiSDK.getOneginiClient(context);
    final Retrofit retrofit = new Retrofit.Builder()
        .client(okHttpClient)
        .baseUrl(oneginiClient.getConfigModel().getResourceBaseUrl())
        .addConverterFactory(GsonConverterFactory.create())
        .addCallAdapterFactory(RxJava2CallAdapterFactory.create())
        .build();

    return retrofit.create(clazz);
  }
}
As you can see in the snippets above, the Resource Gateway url (endpoint) is set explicitly on Retrofit.Builder. Depending on
your needs you may set additional options, for example add a Gson converter or a RxJava2CallAdapterFactory like in the example above. Please notice that the
client passed to the builder has to come from UserClient#getResourceOkHttpClient() as we want to make anonymous resource call.
Performing the resource call
When we have the Retrofit defined and instantiated we can proceed and perform the resource call itself. The SDK will not process the response, which means that you need to handle it on your own. This also means that you need to make sure that the user has a valid access token by triggering user authentication. You don't have to bother about payload encryption because the SDK will take care of that for you. Let's try to send the request and log the answer.
  private void fetchUserDevices() {
    disposable = UserService.getInstance(this)
        .getDevices()
        .doFinally(this::onFetchComplete)
        .subscribe(this::onDevicesFetched, throwable -> onDevicesFetchFailed());
  }

  private void onDevicesFetched(final DevicesResponse devicesResponse) {
    displayFetchedDevices(devicesResponse.getDevices());
  }

  private void onDevicesFetchFailed() {
    showToast("onDevicesFetchFailed");
  }

  private void onFetchComplete() {
    progressBar.setVisibility(View.INVISIBLE);
  }

  private void displayFetchedDevices(final List<Device> devices) {
    final DevicesAdapter adapter = new DevicesAdapter(devices);
    recyclerView.setAdapter(adapter);
    recyclerView.setLayoutManager(new LinearLayoutManager(this));
  }

  private void showToast(final String message) {
    Toast.makeText(this, message, Toast.LENGTH_SHORT).show();
  }

  @Override
  public void onDestroy() {
    if (disposable != null) {
      disposable.dispose();
    }
    super.onDestroy();
  }
The operation will succeed only in case the user's access token is available. Otherwise, the Resource Gateway will respond with 401 unauthorized, meaning that the provided access token was not valid.
Fetching a resource on behalf of implicitly authenticated user
In order to request a resource for a specific implicitly authenticated user, the client needs to be registered and also the user's implicit access token needs
to be present within application memory. So it is required to have the implicit authentication flow UserClient#authenticateUserImplicitly finished
successfully before a resource call on behalf of an implicitly authenticated user can be made. A resource request can be typically used in cases where usage
of certain functionality or accessing resources does not require user to explicitly authenticate himself. The implicit authentication can be used for accessing
less sensitive resources.
Defining REST interface
The first step we need to take in order to fetch a resource is to define a REST interface. Please note that the path user-id-decorated is relative to
the endpoint which we need to configure on the HTTP client before making a call. Please follow one of many Retrofit tutorials for details.
import com.onegini.mobile.exampleapp.model.ImplicitUserDetails;
import retrofit2.http.GET;
import io.reactivex.Single;

public interface ImplicitUserClient {

  @GET("user-id-decorated")
  Single<ImplicitUserDetails> getImplicitUserDetails();
}
Defining the REST Adapter
Next, we need to setup the retrofit instance by providing the resource client (UserClient#getImplicitResourceOkHttpClient(), Resource Gateway url
and also REST interface which we have defined in previous step.
Example code
import com.google.gson.annotations.SerializedName;

public class ImplicitUserDetails {

  @SerializedName("decorated_user_id")
  private String decoratedUserId;

  @Override
  public String toString() {
    return decoratedUserId;
  }
}
import android.content.Context;
import com.onegini.mobile.exampleapp.model.ImplicitUserDetails;
import com.onegini.mobile.exampleapp.network.client.ImplicitUserClient;
import com.onegini.mobile.exampleapp.network.client.SecureResourceClient;
import io.reactivex.Single;
import io.reactivex.android.schedulers.AndroidSchedulers;
import io.reactivex.schedulers.Schedulers;

public class ImplicitUserService {

  private static ImplicitUserService INSTANCE;

  public static ImplicitUserService getInstance(final Context context) {
    if (INSTANCE == null) {
      INSTANCE = new ImplicitUserService(context);
    }
    return INSTANCE;
  }

  private final ImplicitUserClient applicationDetailsRetrofitClient;

  private ImplicitUserService(final Context context) {
    applicationDetailsRetrofitClient = SecureResourceClient.prepareSecuredImplicitUserRetrofitClient(ImplicitUserClient.class, context);
  }

  public Single<ImplicitUserDetails> getImplicitUserDetails() {
    return applicationDetailsRetrofitClient.getImplicitUserDetails()
        .subscribeOn(Schedulers.io())
        .observeOn(AndroidSchedulers.mainThread());
  }
}
import android.content.Context;
import com.onegini.mobile.exampleapp.OneginiSDK;
import com.onegini.mobile.sdk.android.client.OneginiClient;
import okhttp3.OkHttpClient;
import retrofit2.Retrofit;
import retrofit2.adapter.rxjava.RxJava2CallAdapterFactory;
import retrofit2.converter.gson.GsonConverterFactory;

public class SecureResourceClient {

  public static <T> T prepareSecuredImplicitUserRetrofitClient(final Class<T> clazz, final Context context) {
    final OkHttpClient okHttpClient = OneginiSDK.getOneginiClient(context).getUserClient().getImplicitResourceOkHttpClient();
    return prepareSecuredRetrofitClient(clazz, context, okHttpClient);
  }

  private static <T> T prepareSecuredRetrofitClient(final Class<T> clazz, final Context context, final OkHttpClient okHttpClient) {
    final OneginiClient oneginiClient = OneginiSDK.getOneginiClient(context);
    final Retrofit retrofit = new Retrofit.Builder()
        .client(okHttpClient)
        .baseUrl(oneginiClient.getConfigModel().getResourceBaseUrl())
        .addConverterFactory(GsonConverterFactory.create())
        .addCallAdapterFactory(RxJava2CallAdapterFactory.create())
        .build();

    return retrofit.create(clazz);
  }
}
As you can see in the snippets above, the Resource Gateway url (endpoint) is set explicitly on Retrofit.Builder. Depending on
your needs you may set additional options, for example add a Gson converter or a RxJava2CallAdapterFactory like in the example above. Please notice that the
client passed to the builder has to come from UserClient#getImplicitResourceOkHttpClient() as we want to make resource call for implicitly authenticated user.
Performing the resource call for implicitly authenticated user
When we have the Retrofit defined and instantiated we can proceed and perform the resource call itself. The SDK will not process the response, which means that you need to handle it on your own. This also means that you need to make sure that the user has a valid access token by triggering implicit user authentication. You don't have to bother about payload encryption because the SDK will take care of that for you. Let's try to send the request and log the answer.
  private void callImplicitResourceCallToFetchImplicitUserDetails() {
    disposables.add(
        ImplicitUserService.getInstance(this)
            .getImplicitUserDetails()
            .subscribe(this::onImplicitUserDetailsFetched, this::onImplicitDetailsFetchFailed)
    );
  }

  private void onImplicitUserDetailsFetched(final ImplicitUserDetails implicitUserDetails) {
    implicitUserDetailsTextView.setText(implicitUserDetails.toString());
  }

  private void onImplicitDetailsFetchFailed(final Throwable throwable) {
    implicitUserDetailsTextView.setText(R.string.implicit_user_details_fetch_failed_label);
    throwable.printStackTrace();
  }
The operation will succeed only in case the user's implicit access token is available. Otherwise, the Resource Gateway will respond with 401 unauthorized, meaning that the provided access token was not valid.
Performing modified REST requests
In some cases you may want to add custom headers to all requests made by your RestAdapter. To do so, please create a
requestInterceptor instance and set it in the RestAdapter.Builder when you are constructing your RestAdapter.
RequestInterceptor requestInterceptor = new RequestInterceptor() {
    @Override
    public void intercept(RequestFacade request) {
        request.addHeader("X-custom-header", "header value");
        request.addHeader("Content-type", "application/json");
    }
};

RestAdapter restAdapter = new RestAdapter.Builder()
    .setRequestInterceptor(requestInterceptor)
    .build();
For more information on adding headers or parameters to requests see the following Retrofit tutorial.
Also please note that for Retrofit 2.X you should add OkHttp Interceptor instead.