Setting up the project
This section describes the first steps to integrate the Onegini iOS SDK with an existing iOS project.
Adding the SDK to your project
There are two ways to add the iOS SDK to your project. Manually or through CocoaPods as a Pod.
Cocoapods
CocoaPods is the preferred way to add the Onegini SDK to your project. It provides the most convenience and ease of use. You don't have to manually change your Xcode project file.
Install the CocoaPods Artifactory plugin
The Onegini SDK is uploaded to the Onegini Artifactory repository. In order to let CocoaPods use an Artifactory repository you need to install a specific plugin.
gem install cocoapods-art
Note: It is strongly recommended that you install CocoaPods as a Rubygem and not through Homebrew. Installing with Homebrew may cause issues with the CocoaPods hooks mechanism that the plugin relies on.
Setup authentication
The Onegini SDK repository is not a public repository. You must provide credentials in order to access the repo.
Create a file named .netrc in your Home folder (~/) and add the following contents to it:
machine repo.onegini.com
login <username>
password <password>
Replace the <username> and <password> with the credentials that you use to login to support.onegini.com.
Add the OneginiSDK to your Podfile
Adding the OneginiSDK to your Podfile is done in two steps. First you need to add the cocoapods-art plugin as a plugin in your Podfile.
plugin 'cocoapods-art', :sources => [
 'onegini'
]
Second you need to add the Onegini SDK as a Pod in one of your project targets.
target 'OneginiExampleApp' do
  pod 'OneginiSDKiOS', '~> 5.01.01-SNAPSHOT'
  pod 'ZFDragableModalTransition', '~> 0.6'
  pod 'MBProgressHUD', '~> 1.0.0'
end
Adding and updating the onegini CocoaPods repository
The Onegini CocoaPods repository must be added to your local machine using the following command.
pod repo-art add onegini https://repo.onegini.com/artifactory/api/pods/cocoapods-public
In order to update the Repository you must manually perform an update
pod repo-art update onegini
Note: It is a good habbit to perform
pod repo-art update oneginievery once in a while just as you are doing it with the CocoaPods master repository.
Manually
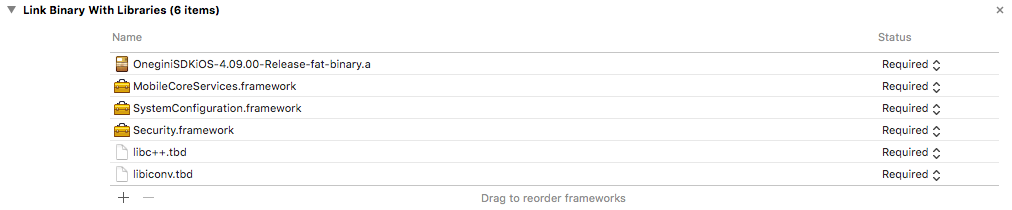
Copy the Onegini SDK static library and header files into the Frameworks group of the project workspace. Add the libOneginiSDKiOS-X.XX.XX.a static library
(along with all the required libraries and frameworks) to the "Link Binary With Libraries" section of the Build Phases. You
can obtain the Onegini SDK through Onegini support.
The result should look similar to the following example:
Build Settings
The Following settings needs to be changed:
Other Linker Flags- add the-ObjCflagEnable bitcode- set toNoLibrary Search Paths- Add the folder containing the static library and header files, in this example the folder is named "OneginiSDK" so the "Library Search Paths" should be similar to the following example:

SDK configuration
Before the SDK can be used in an application it needs to be configured. E.g. you need to tell it the location (URL) of the Token Server instance, but also some of the security features need to be configured. There are two ways of the providing configuration:
- Manually
- Using the SDK Configurator
The latter is the preferred way of working since it does not require the manual steps described in the paragraph below. The SDK configurator can be found on GitHub.
Manual configuration
The paragraphs below explain how to manually configure the SDK.
Configuration model
The SDK relies on a set of configuration parameters which must be provided to the SDK by means of an instance of ONGConfigModel. The backing data model of
the ONGConfigModel is a property list. The App is responsible for creating an instance of the ONGConfigModel with a backing property list and the app also
needs to provide it to the ONGClientBuilder. Initialization of ONGConfigModel is described here.
Certificate pinning
Certificates used by the SDK are secured from tampering. In order for the SDK to detect certificate tampering it is required to perform Certificate Pinning.
Instantiating the SDK
The whole functionality of the SDK is accessed by means of a single shared client which is named ONGClient. The client must be instantiated once early
in the App lifecycle and thereafter only referred to by it's shared instance. This is usually done in the root view controller but can also be done in a
specific non UI class. In order to instantiate SDK ONGConfigModel containing the configuration parameters and an array of PEM Base64 encoded X509 certificates
has to be provided to the ONGClientBuilder. This class is the only way to instruct SDK about configuration, X509-encoded certificates and other settings.
After instantiating the shared instance of ONGClient it is required to call its start: method. At this method the client verifies integrity and performs
validation and registration calls, the result is returned in callback. Accessing ONGDeviceClient and ONGUserClient (both as shared instances or ONGClient
properties) before calling start: method will raise NSInternalInconsistencyException.
Example of the ONGClient initialization:
- (BOOL)application:(UIApplication *)application didFinishLaunchingWithOptions:(NSDictionary *)launchOptions
{
    ...
    NSString *const certificate = @"AaXeRCk/luuGtm87fM04wO+mPZn+C+mv626PAcwDj1hKvTfIPWhRRH224hoFiB85ccsJP81cqcdnUl4XmGFO3";
    NSString *configPath = [[NSBundle mainBundle] pathForResource:@"config" ofType:@"plist"];
    ONGConfigModel *configModel = [[ONGConfigModel alloc] initWithContentsOfFile:configPath];

    [[[[ONGClientBuilder new] setConfigModel:configModel] setX509PEMCertificates:@[certificate]] build];
    [[ONGClient sharedInstance] start:nil];
    ...
}
Configuration via SDK configurator
Once configurator has generated and added the OneginiConfigModel class to your App, you can instantiate SDK by calling
the -[ONGClientBuilder build] method. It automatically finds the OneginiConfigModel in order to configure SDK correctly.
Example of the ONGClient initialization:
- (BOOL)application:(UIApplication *)application didFinishLaunchingWithOptions:(NSDictionary *)launchOptions
{
    ...
    [[ONGClientBuilder new] build];
    [[ONGClient sharedInstance] start:^(BOOL result, NSError *error) {
        if (error != nil) {
            if (ONGGenericErrorOutdatedApplication == error.code) {
                [self showAlertWithTitle:@"Application disabled" message:@"The application version is no longer valid, please visit the app store to update your application"];
            }

            if (ONGGenericErrorOutdatedOS == error.code) {
                [self showAlertWithTitle:@"OS outdated" message:@"The operating system that you use is no longer valid, please update your OS."];
            }
        }
    }];
    ...
}
Important additional information
Using the security controls during development
Please note that the iOS SDK has the ability to detect if the app works in debug mode or with a debugger attached. This feature is enabled by default. When debug mode detection is enabled and a debugger is detected (which is most likely the case if you run your app in an simulator), the SDK will not allow to execute any of the user related flows and return an error. To disable this feature during development please follow the security controls guide.
Prevent calculating the application signature during development
Regardless when you configure the SDK manually or use the SDK Configurator, you must calculate the Application Signature and provided it to the Token Server every time your application is modified. During development this will hamper development greatly. To suppress this, turn on development mode in the Token Server application configuration.