Getting started
This topic guide describes how you should get started with the Onegini Android SDK. It outlines how the API is set up, how the SDK generally works and what the requirements are.
We first advice you to read the App developer quickstart before reading this topic guide.
General setup of the Onegini Android SDK
OneginiClient
The main facade of the SDK is the OneginiClient. This class exposes the other Onegini client objects (UserClient and DeviceClient) that you can access. The
OneginiClient is a singleton of which you can only construct a single instance using the OneginiClientBuilder class. The other clients that can be accessed
through the OneginiClient are:
UserClient- only contains user related functionalityDeviceClient- only contains device related functionality
Thread safety
All methods that you call on the Onegini Android SDK must be performed on the main thread of your mobile application. The SDK will not enforce this, hence you might expect strange behaviour if you do not execute the methods on the main thread. Internally the SDK will use multiple threads to make sure it does not block the main thread. You as a developer only have to make sure that you execute the SDK methods from the main thread.
Delegating control from the app to the SDK and vice versa
To utilize the functionality that the SDK provides you must integrate it into your application. The functionality that the SDK provides sometimes require interaction with the end-user. The SDK itself does not contain any UI but will request you to implement specific actions for your end-users.
The general setup is that you must trigger a functionality in the SDK by calling one of it's methods. Let's take user authentication as an example.
In order to start the user authentication you must call the UserClient.authenticateUser() method. Below is an example of this method call (taken from the
Android example app):
OneginiSDK.getOneginiClient(this).getUserClient().authenticateUser(userProfile, new OneginiAuthenticationHandler() {

  @Override
  public void onSuccess(final UserProfile userProfile, final CustomInfo customInfo) {
    // Authentication successful
  }

  @Override
  public void onError(final OneginiAuthenticationError oneginiAuthenticationError) {
    // Authentication failed
  }
});
The second parameter that you must provide is a handler. This handler is responsible for giving you the feedback whether the result of the triggered action
was successful or not. However as a part of the authentication functionality a few things happen. Depending on the authentication method that is preferred
for a user the user will be requested to enter his/her PIN or perform fingerprint authentication. This action is triggered by the SDK. The SDK provides special
RequestHandlers for this that need to be implemented by you.
A RequestHandler is a class that contains methods to hand over control from the SDK to your application. When the preferred method of authentication for a
user is PIN authentication the startAuthentication method of the class that implements the OneginiPinAuthenticationRequestHandler interface is called. After
the end-user has entered his/her PIN, the PIN needs to be provided to the SDK to continue the authentication flow. The startAuthentication method contains a
callback object to submit the PIN to the SDK.
Error handling
Interaction with the Onegini SDK can result in errors. Please check out our error handling topic guide for more details on error handling.
SDK Requirements
The Onegini Android SDK supports apps running on API level 16+ (Android Jelly Bean and newer), so make sure that your project also sets it's minimum API level to 16+.
Reasons why older platforms are not supported
The number of devices with API lower that 16 is relatively small and it's constantly decreasing. Supporting many different API versions is getting more and more complex over time. Different versions of Android's API have different bugs, including security vulnerabilities. Some of the vulnerabilities force us to protect the app with additional workarounds, that significantly increase development time and in some cases it also slows down the performance of an app. Other vulnerabilities can't be solved at all by the SDK.
Third party libraries
| Library | Version | Description |
|---|---|---|
| com.google.firebase:firebase-messaging | 17.3.4 | Android FCM library |
| com.squareup.okhttp3:okhttp | 3.11.0 | Http client |
| com.squareup.okhttp3:okhttp-urlconnection | 3.11.0 | |
| com.squareup.okhttp3:logging-interceptor | 3.11.0 | |
| com.squareup.retrofit2:retrofit | 2.4.0 | REST client |
| com.madgag.spongycastle:core | 1.58.0 | Encryption library used for PGP encryption |
| com.madgag.spongycastle:prov | 1.58.0 | |
| com.madgag.spongycastle:pg | 1.58.0 | |
| com.madgag.spongycastle:pkix | 1.58.0 | |
| commons-io:commons-io | 2.6 | Apache Commons IO |
| com.onegini.misc:og-ocra | 100.0.0 | OCRA Implementation |
| com.google.dagger:dagger | 2.17 | Dependency injection library |
| io.reactivex.rxjava2:rxjava | 2.2.2 | Library for reactive programming |
| io.reactivex.rxjava2:rxandroid | 2.1.0 | Library for reactive programming on Android |
| net.zetetic:android-database-sqlcipher | 3.5.9 | Encryption library for SQLite database |
Android User-Permissions
The SDK declares following permissions in the AndroidManifest.xml file:
  <!-- SDK's AndroidManifest.xml -->
  <uses-permission android:name="android.permission.INTERNET" />
  <uses-permission android:name="android.permission.ACCESS_NETWORK_STATE" />
  <uses-permission android:name="android.permission.USE_FINGERPRINT" />
Those permissions are required to gain access to the network and in order to use fingerprint authenticator. During a build process of an app those permissions will be merged to the app's AndroidManifest automatically by a tool called Manifest Merger
Limitations
Google Play App Signing
Google Play currently offers two ways for app signing:
- managing keys and keystore locally
- using the Google Play App Signing
The first option allows you to store your app signing key locally on your machine and use it to sign the app before publishing it:
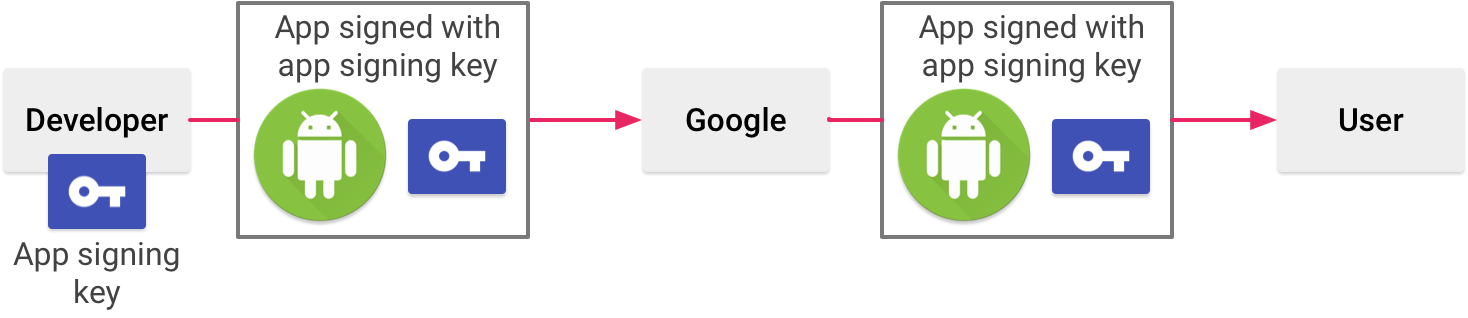
The second option allows you to store the private key in Google cloud services and allow the Google Play to sign the app after uploading it to the store:
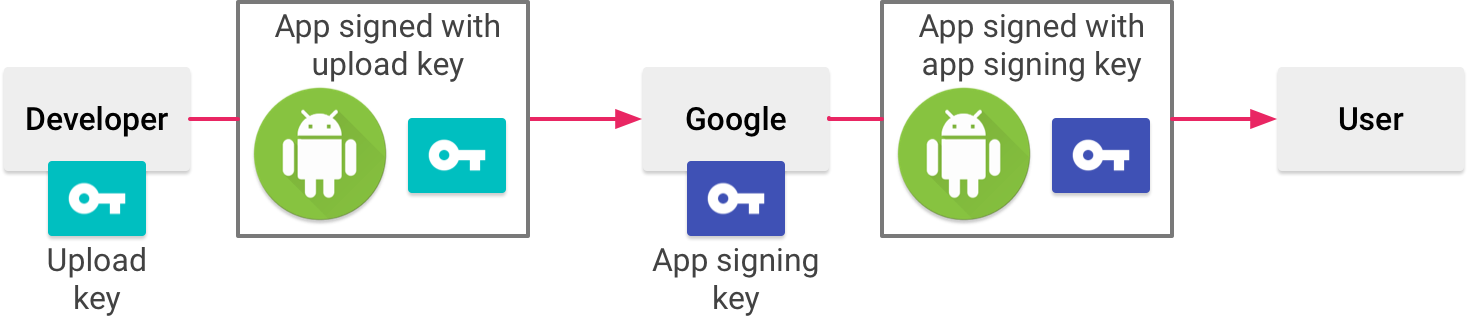
The downside of the Google Play App Signing is that the Google Play not only changes the signature of the app, but also slightly modifies its binaries
(including the AndroidManifest file). As a result the application signature will change after the store signing.
This is fine as long as you are aware that the application signature calculator has to be used AFTER the app signing step, regardless if it was done locally
or in the Google Play Store.
App bundle
Similar to the Google Play App Signing, the App Bundle defers the app signing step and modifies the app binary. The Dynamic Delivery and Dynamic Feature Modules are modifying the app binaries even further, making the tampering protection impossible. Because the tampering protection is a crucial functionality of the Onegini Android SDK, you cannot use the App Bundle format.