Mobile authentication
With mobile authentication the Onegini mobile platform offers a two factor authentication mechanism in a user friendly and secure way. Mobile authentication uses PGP to encrypt data sent on top of an already secure HTTP connection. By using two-way PGP encryption the sender and receivers identity are proven and the data is protected. As a medium to send push messages for mobile authentication, the Apple Push Notification Service (APNS) is used.
- Enrollment
- Handling push notifications
- Mobile Authentication Request
- Answering mobile authentication requests
- Ask the user to confirm a mobile authentication request without additional authentication
- Ask the user to confirm a mobile authentication request with PIN confirmation
- Ask the user to confirm a mobile authentication request with fingerprint authentication confirmation
- Ask the user to confirm a mobile authentication request with FIDO authentication confirmation
- Completion
Enrollment
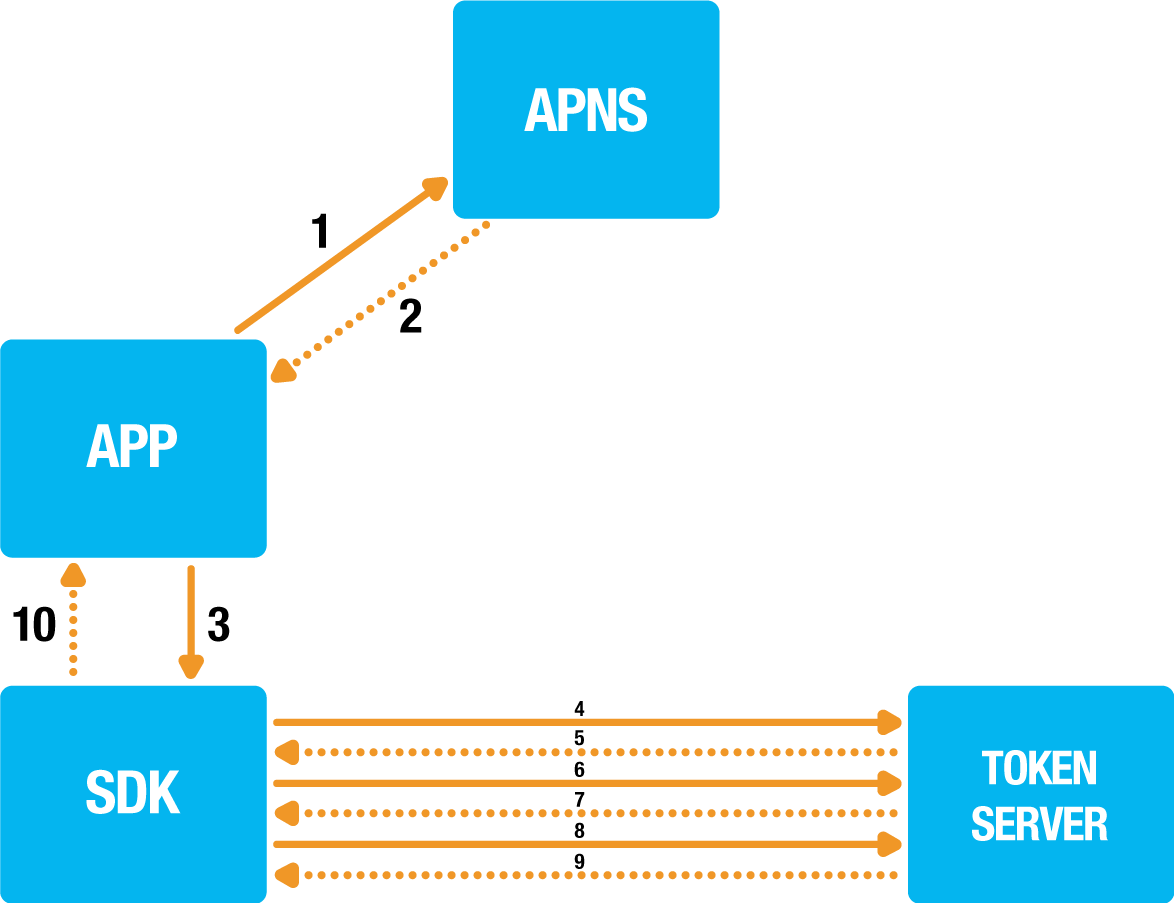
1. APP -> APNS: Receive the push token for the current application from the Apple Push Notification Service.
2. APNS --> APP: The push token is returned.
3. APP -> SDK: Initialize mobile authentication enrollment and provide the push token and handlers.
4. SDK -> Token Server: Initialize mobile authentication enrollment with push token / registration id.
5. Token Server --> SDK: When all input parameters are successfully verified an identifier is returned for the enrollment transaction.
6. SDK -> Token Server: A RSA key pair is generated, the public key is send to the Token Server.
7. Token Server --> SDK: The Token Server will also generate a key pair and return its public key.
8. SDK -> Token Server: Acknowledge the token servers public key is received.
9. Token Server --> SDK: Acknowledge the enrollment process is completed.
10. SDK -> APP: The result of the enrollment flow is reported to the handler.
During the mobile authentication enrollment step the device is registered for mobile authentication. The app itself is responsible for differentiating between different push notification messages. The reason why this responsibility is in the app is that one app can only have one push token. This allows the app to support more push messaging features besides mobile authentication provided by the Onegini SDK.
Setup your app for receiving push notifications. Please consult the Apple push notification documentation for instructions to setup push notifications for your app. When a device token is received this token must be passed on to the client, this must be done every time the app is started and the client is initialized.
Example code to check if push notifications are available:
- (void)application:(UIApplication *)application didRegisterForRemoteNotificationsWithDeviceToken:(NSData *)deviceToken
{
  [[ONGUserClient sharedInstance] storeDevicePushTokenInSession:deviceToken];
}

- (void)application:(UIApplication *)application didFailToRegisterForRemoteNotificationsWithError:(NSError *)error
{
  [[ONGUserClient sharedInstance] storeDevicePushTokenInSession:nil];
}
Mobile authentication enrollment is started by calling the -[ONGUserClient enrollUserForMobileAuthenticationWithDelegate:] method. Below you can see example code to
initialize mobile authentication enrollment:
[[ONGUserClient sharedInstance] enrollUserForMobileAuthenticationWithDelegate:self];
Successive invocations of enrollment for mobile authentication will re-enroll the device.
Handling push notifications
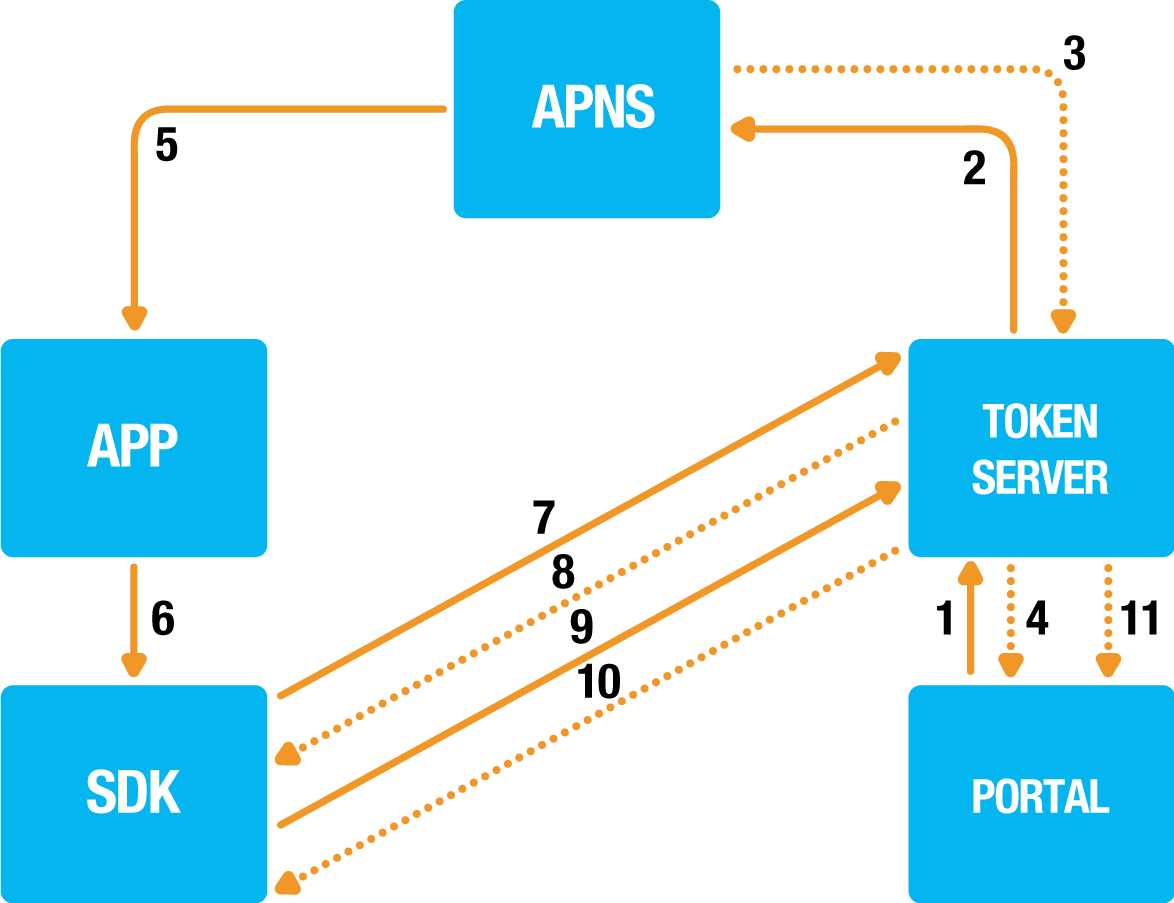
1. Portal -> Token Server: Initialize mobile authentication.
2. Token Server -> APNS: Send the push notification.
3. APNS -> Token Server: Push notification delivery report.
4. Token Server -> Portal: Identifier of the initialized mobile authentication transaction.
5. APNS -> APP: Non-fragile push notification.
6. APP -> SDK: Delegate handling of the push notification to the SDK.
7. SDK -> Token Server: Fetch PGP encrypted message from server.
8. Token Server -> SDK: Base64 encoded PGP encrypted fragile authentication data.
9. SDK -> Token Server: The push message is decrypted and the SDK triggers a delegate so the app can show a dialogue to the end-user. The authentication result is send encrypted to the Token Server.
10. Token Server -> SDK: If the used push type requires feedback on the result e.g. pin usage the result is communicated back to the SDK which will optionally perform a retry.
11. Token Server -> Portal: A callback is send to inform the portal about the mobile authentication result.
Push notifications are handled by calling -[ONGUserClient handleMobileAuthenticationRequest:delegate:]. If a push notification is intended for the SDK the
payload will contain a transaction_id. SDK will determine if it should do something with the push notification or not before handling it. This allows the
app to support multiple types of push notifications next to the mobile authentication push notifications. Since notifications may require authentication the
SDK needs a delegate (ONGMobileAuthenticationRequestDelegate) to authenticate.
Example code for push notification handling:
- (void)application:(UIApplication*)application didReceiveRemoteNotification:(NSDictionary*)userInfo {
  // Forward the push message to the OneginiClient
  BOOL result = [[ONGUserClient sharedInstance] handleMobileAuthenticationRequest:userInfo delegate:self];
  if (result) {
    // handled by the SDK
  } else {
    // forward to another handler
  }
}
Mobile Authentication Request
Mobile authentication requests are represented by ONGMobileAuthenticationRequest class. Objects of this class are passed to every
ONGMobileAuthenticationRequestDelegate method. From those obejcts you can get following information about currently processes mobile authentication request:
userProfile- instance ofONGUserProfilefor which request has been received.type- string representing type of the notification which is configured in the Token Server admin panel. The type can be used to distinguish between business functionalities. For example, mobile authentication can be used for logging in or transaction approval.message- message specified by the portal when initiating the mobile authentication request. This field represents thesecure_messageparameter sent while initiating the mobile authentication request. This message length is not limited.userInfo- user info received from the-[UIApplicationDelegate application:didReceiveRemoteNotification:]TheuserInfocan also contain a message. The message specified in theuserInfoobject represents themessageparameter that was sent while initiating the mobile authentication request. The length of this message is limited to 155 characters due to APNS' message length limitations.transactionId- A unique identifier for each Mobile Authentication request.
Answering mobile authentication requests
After you have given the push notification to the SDK, the SDK will request the app to let the user either confirm or deny the request.
The SDK will delegate control back to the provided ONGMobileAuthenticationRequestDelegate implementation. Hence, the application must contain a class that
implements the methods specified below.
Ask the user to confirm a mobile authentication request without additional authentication
- (void)userClient:(ONGUserClient *)userClient didReceiveConfirmationChallenge:(void (^)(BOOL confirmRequest))confirmation forRequest:(ONGMobileAuthenticationRequest *)request {
    // Code to display your mobile authentication confirmation view here..

    // Once the user has answered the confirmation, call the confirm method specifying whether the user confirms or denies the request
    confirmation(YES);
}
Ask the user to confirm a mobile authentication request with PIN confirmation
- (void)userClient:(ONGUserClient *)userClient didReceivePinChallenge:(ONGPinChallenge *)challenge forRequest:(ONGMobileAuthenticationRequest *)request {
    // Code to display the PIN view here..

    // Once the user has entered the PIN call the delegate
    [challenge.sender respondWithPin:@"pin" challenge:challenge];

    // Or cancel challenge
    [challenge.sender cancelChallenge:challenge];
}
Ask the user to confirm a mobile authentication request with fingerprint authentication confirmation
- (void)userClient:(ONGUserClient *)userClient didReceiveFingerprintChallenge:(ONGFingerprintChallenge *)challenge forRequest:(ONGMobileAuthenticationRequest *)request
{
    // Code to display the mobile authentication view here..

    // Continue Mobile Authentication using Fingerprint with default prompt
    [challenge.sender respondWithDefaultPromptForChallenge:challenge];

    // Or use custom prompt
    [challenge.sender respondWithPrompt:@"Confirm money transfer" challenge:challenge];

    // Fallback to pin if needed
    [challenge.sender respondWithPinFallbackForChallenge:challenge];

    // Or cancel challenge
    [challenge.sender cancelChallenge:challenge];
}
Depending on your needs the challenge may be responded in a various ways: continue with default prompt, continue with custom prompt, fallback to pin or
even cancel. After you have responded to the challenge, the SDK presents the TouchID authentication with the supplied (or default) prompt.
Since this method is optional, the SDK will automatically fallback to PIN authentication if this method is not implemented.
Important: in order to receive fingerprint challenges you have to register the fingerprint authenticator first by following the Fingerprint Authenticator topic guide.
Ask the user to confirm a mobile authentication request with FIDO authentication confirmation
- (void)userClient:(ONGUserClient *)userClient didReceiveFIDOChallenge:(ONGFIDOChallenge *)challenge forRequest:(ONGMobileAuthenticationRequest *)request
{
    // Code to display the mobile authentication view here..

    // Continue Mobile Authentication using FIDO authenticator
    [challenge.sender respondWithFIDOForChallenge:challenge];

    // Fallback to pin if needed
    [challenge.sender respondWithPinFallbackForChallenge:challenge];

    // Or cancel challenge
    [challenge.sender cancelChallenge:challenge];
}
You can respond to a FIDO challenge in three different ways. Responding with FIDO will present the FIDO view which will handle the authentication process. You can also provide the possibility to a user to authenticate with PIN instead of FIDO if needed. Cancelling the challenge will deny the mobile authentication request.
Important: in order to receive FIDO challenges you has to register the FIDO authenticator first by following the FIDO Authenticator topic guide.
Completion
Once the mobile authentication request has been handled there are two callbacks that might be called:
-[ONGMobileAuthenticationRequestDelegate userClient:didHandleMobileAuthenticationRequest:] and
-[ONGMobileAuthenticationRequestDelegate userClient:didFailToHandleMobileAuthenticationRequest:error:] for success and failure correspondingly. Both methods
are optionals.
For the success callback you may want to refresh your App's data or hide the view:
- (void)userClient:(ONGUserClient *)userClient didHandleMobileAuthenticationRequest:(ONGMobileAuthenticationRequest *)request
{
    // hide the view, update application data, etc
}
For the failure callback, the situation is a bit more complex. It is strongly recommended to implement error handling. The SDK may deliver important errors
such as user's (server-side) deregistration which requires special handling such as user logout, unwinding the UI to the login page, etc. However, it also may
deliver errors that can be ignored such as the cancellation error which happens, when you cancel the challenge by calling
the -[id<ONGFingerprintChallengeSender> cancelChallenge:] or -[id<ONGFingerprintChallengeSender> cancelChallenge:] methods:
- (void)userClient:(ONGUserClient *)userClient didFailToHandleMobileAuthenticationRequest:(ONGMobileAuthenticationRequest *)request error:(NSError *)error
{
    switch (error.code) {
        case ONGGenericErrorActionCancelled:
            // authentication has been cancelled - we can ignore it
            break;

        case ONGMobileAuthenticationRequestErrorNotFound:
            // mobile request was not found on the TS. We can either notify user or ignore it.
            break;

        case ONGGenericErrorDeviceDeregistered:
        case ONGGenericErrorUserDeregistered:
            // this is a serious error: due to too many invalid pin attempts SDK has been logged out user. developer has to "logout" UI and tear down all related services.
            break;

        default:
            // other errors
            break;
    }
}