Mobile authentication configuration
Via mobile authentication a second factor login can be realized. Mobile authentication is using SMS, OTP and push messages to interact with the end-user. This section will describe how to configure mobile authentication.
Note: Mobile authentication should be enabled on system level.
In the admin console the configuration related to mobile authentication can be found in the mobile config section.
- Configure mobile authentication enrollment rules
- Configure push enrollment rules
- Configure push authentication
- Configure SMS authentication
- Configure access via the API to initiate mobile authentication
- Configure mobile authentication types
- Configuration for Callback endpoints
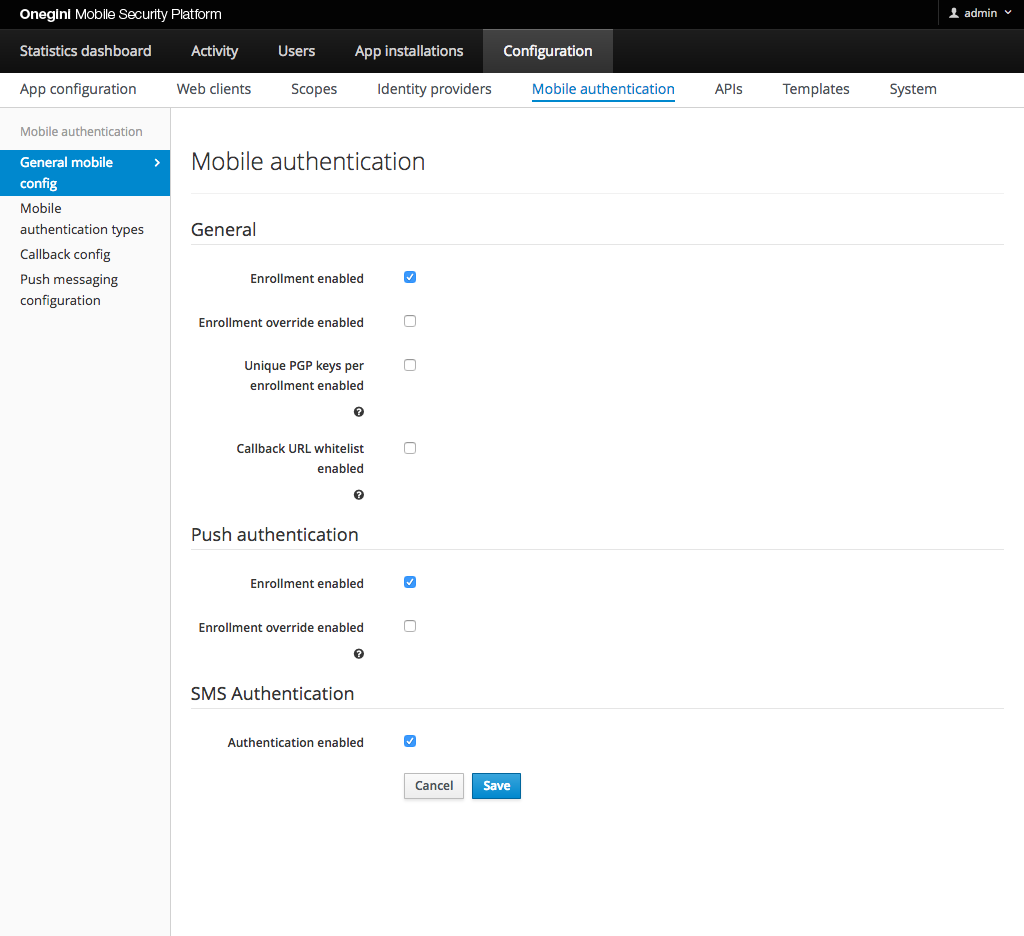
Configure mobile authentication enrollment rules
A user must enroll with PGP encryption keys to use mobile authentication. The user can be enrolled on several devices at a time.
Note: The following options are not accessible if enrollment is disabled.
By default a user can enroll again only by disconnecting the enrolled device or disable mobile authentication via the end user device api. By enabling the
Enrollment override enabled option in General subsection in the admin panel, the user is able to update the PGP encryption keys by just enrolling mobile authentication again.
By enabling the Unique PGP keys per enrollment enabled option in General subsection in the admin panel, for every user enrollment a new PGP key pair will be generated. For better performance it is advised to not enable this option.
Go to the General subsection in General mobile config section to configure described options.
Configure push enrollment rules
Note: In order to be able to configure push enrollment rules, mobile authentication enrollment must be enabled. Push enrollment is not possible without mobile authentication enrollment performed upfront.
A user must enroll on an application instance to use mobile authentication via push messaging. The user can be enrolled on only one application instance at a time. If a user has a smart phone and a tablet on which the application is installed, the user can only enroll for push authentication on one of these devices.
By default a user can only switch from device by disconnecting the enrolled device or disable push authentication via the end user device api. By enabling the
Enrollment override enabled option in Push authentication subsection in the admin panel, the user is able to switch between the devices by just enrolling push authentication again.
Push authentication will then be disabled on the previous device. Go to the General mobile config section to configure this option.
Note: When push authentication is the only method for second factor authentication, enabling the override enrollment function might introduce a security risk. Anyone who has access to the first factor credentials can enroll a new device and use this device for second factor authentication. A decision to enable the device enrollment override feature should therefore be taken carefully.
Configure push authentication
Push authentication consists of two processes which can be enabled/disabled individually:
- Device enrollment: this process is used to activate push authentication for a user on a certain device.
- Authorization: this process is used to actually send push messages to users for authorization.
For push authentication platform specific services are used offered by the platform vendors (Google and Apple). In the application version configuration section, the administrator can specify the platform of a version and the app version specific configuration for push authentication.
Some optional detailed technical configuration can be done via the mobile authentication Docker Compose environment variables.
To perform the actual push authentication some mobile authentication types have to be configured.
iOS
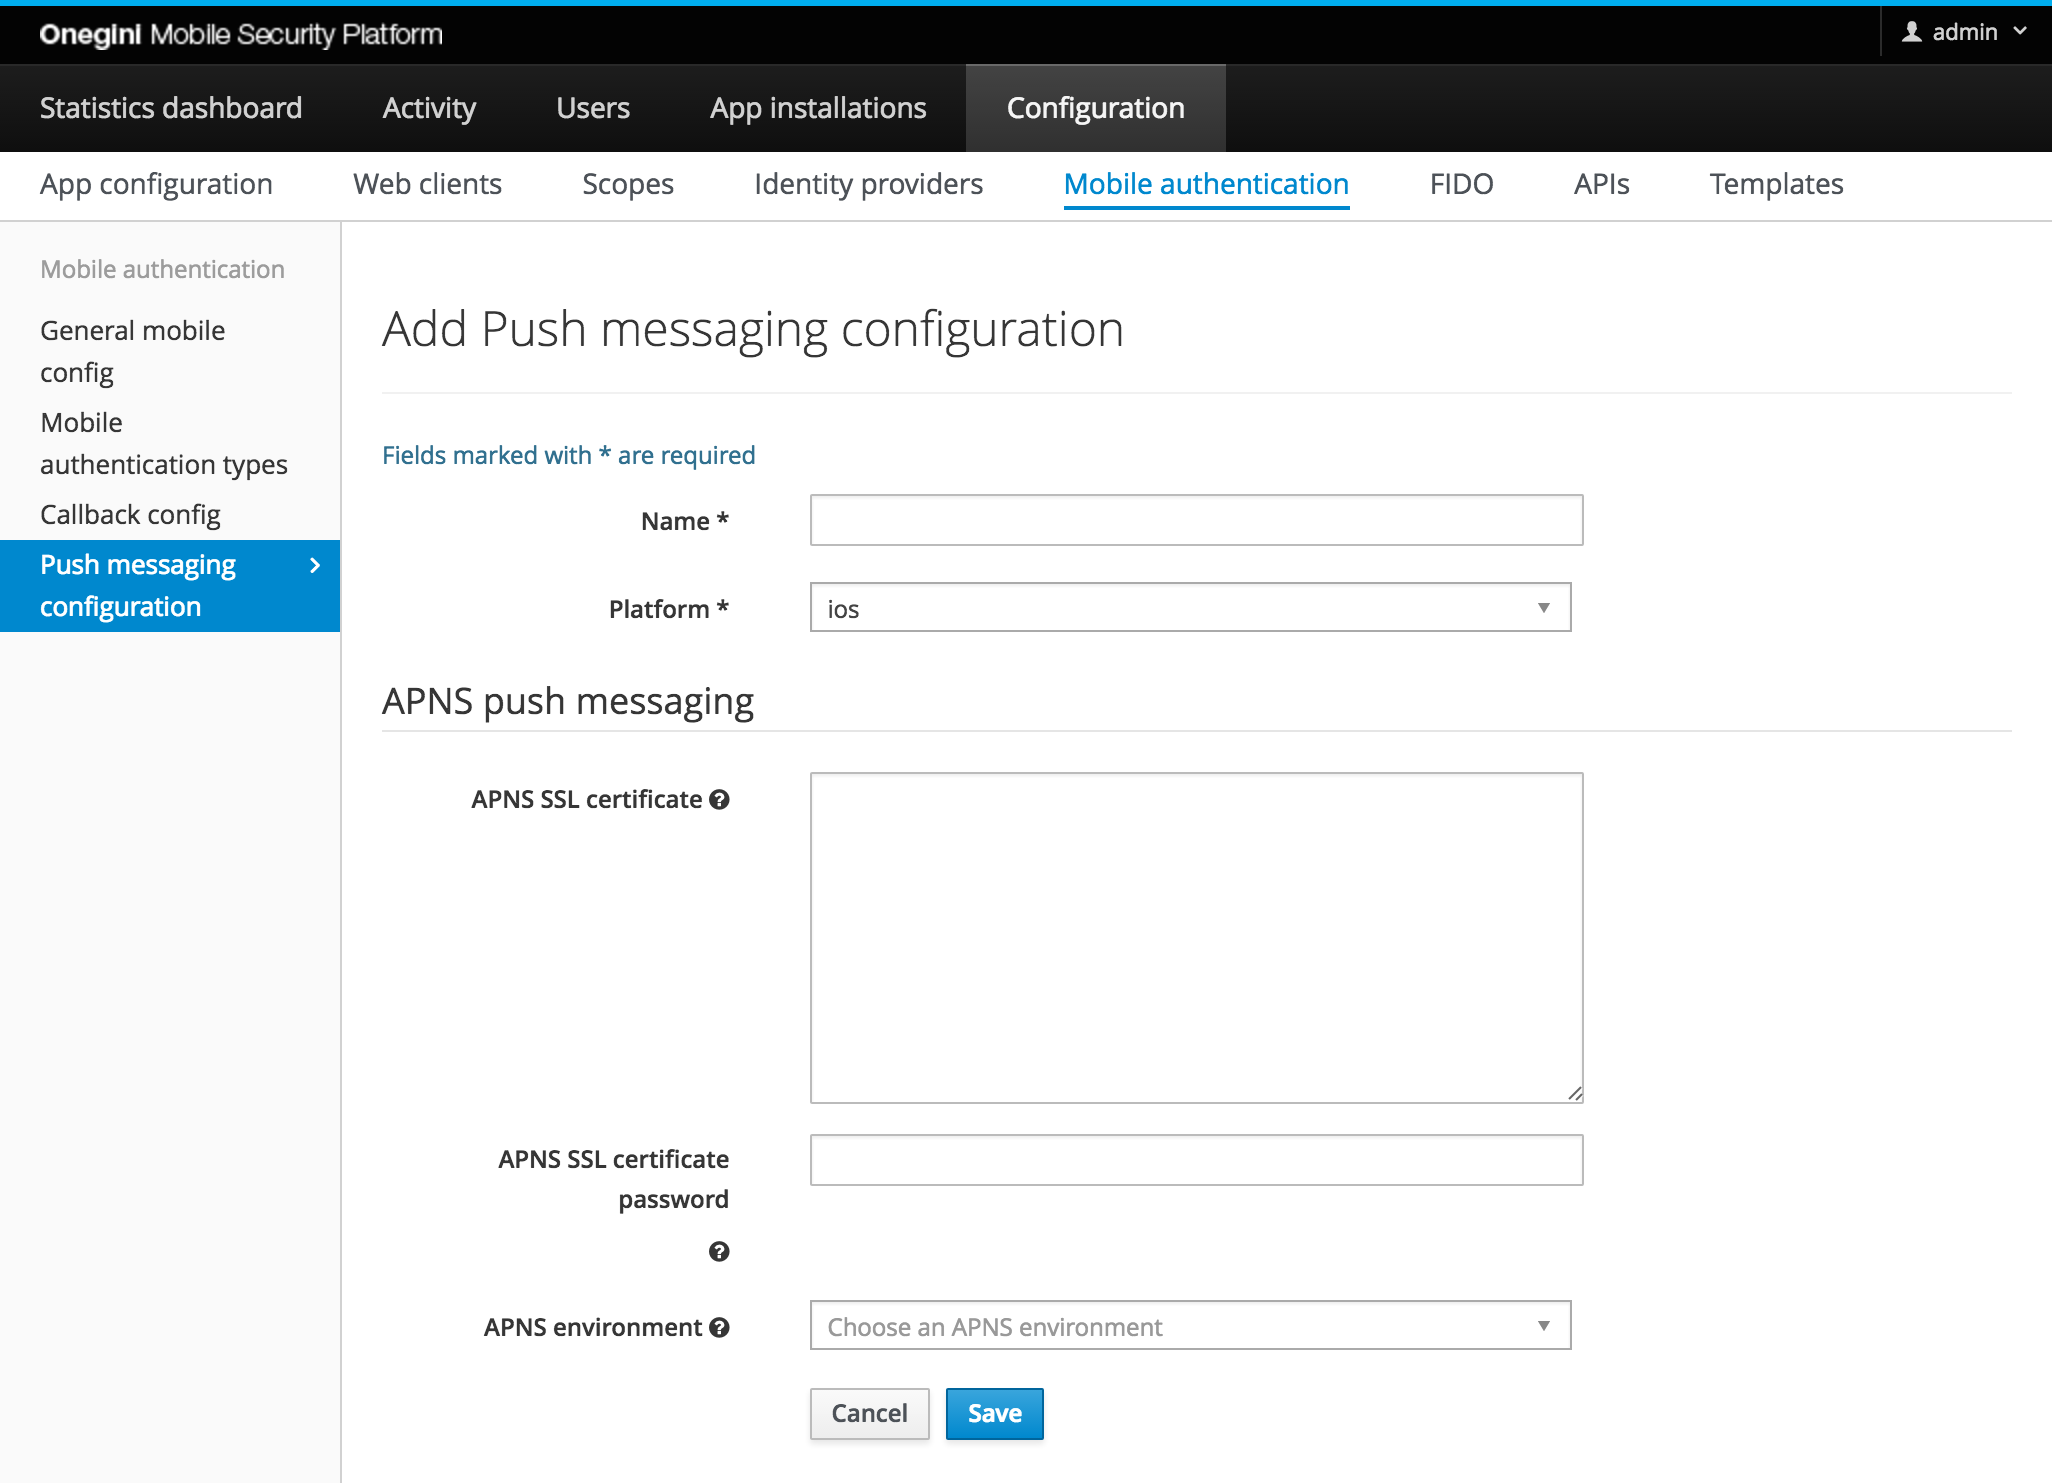
For iOS applications the Apple Push Notification Service (APNS) is used. This service uses an SSL certificate for authentication. To configure the certificate the following steps describe the necessary actions on a high-level:
- The mobile application must be registered in the Apple developer member center,
- Locally a certificate file should be generated,
- The generated certificate needs to be uploaded to Apple who will sign this certificate and configures it for the app,
- The signed certificate should be downloaded and exported (Personal Information Exchange format
*.p12)
All steps are described in detail in the Apple developer documentation. We use the legacy version of APNS, but the steps to establish certificate-based provider-to-APNS trust have remained the same.
To configure the certificate it has to be in the .p12 format and Base64 encoded. A description how to get the certificate in the format suitable for
configuration can be found in our APNS service reference guide.
The password that is used to create the p12 file should be configured as APNS SSL certificate password. Typically the app developer should be responsible for
providing the certificate and certificate password once the app is registered in the Apple Dev Center.
Apple supports two environments: production and sandbox. The urls for these environments are pre-configured and can be adapted if required. Please note that both environments need different certificates to be configured in the Apple developer member center.
Note: No outgoing proxy can be configured for APNS. If outgoing traffic is blocked open the ports required by APNS on your firewall.
Android
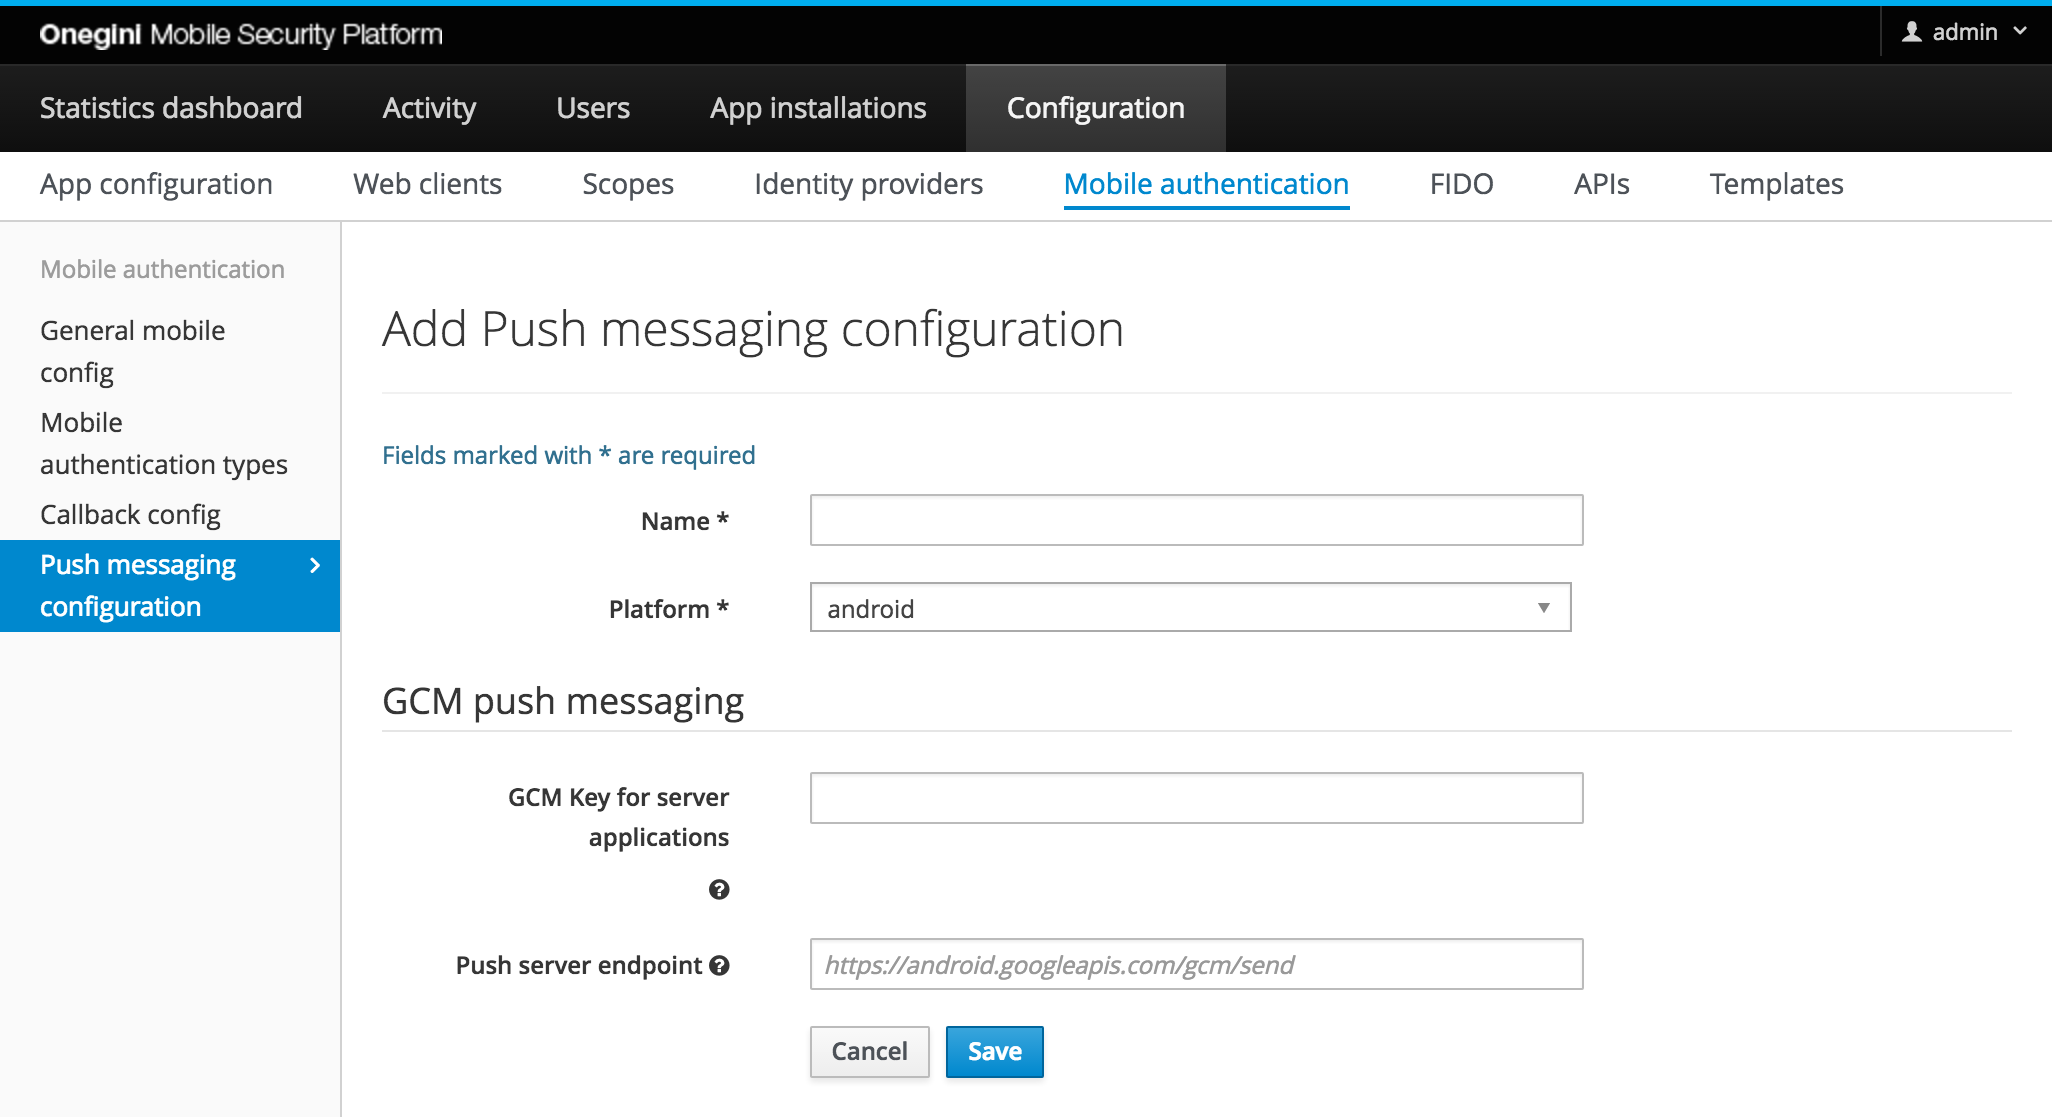
For Android applications the Google Cloud Messaging (GCM) services are used. The default URI for these services is already configured
https://android.googleapis.com/gcm/send. If a different url is required it can be provided as push server endpoint, otherwise leave this field empty.
GCM requires an api key to identify the project/application you would like to send push messages for. This key can be retrieved via the GCM console. In this console navigate to api usage to enable cloud messaging and to retrieve the api key.
If you are using an outgoing proxy. A proxy can be configured for the communication with GCM. For the proxy functionality the following settings can be set.
| Property | Description |
|---|---|
| TOKEN_SERVER_ENGINE_EXTERNAL_REST_SERVICES_PROXY_ENABLED_BOOLEAN | Boolean to indicate if a proxy should be used, by default using a proxy is disabled. |
| TOKEN_SERVER_ENGINE_EXTERNAL_REST_SERVICES_PROXY_PREEMPTIVE_AUTH_ENABLED_BOOLEAN | Boolean to indicate if preemptive authentication must be enabled for the specified proxy host. |
| TOKEN_SERVER_ENGINE_EXTERNAL_REST_SERVICES_PROXY_USERNAME | Username for authentication on the proxy if authentication is required. |
| TOKEN_SERVER_ENGINE_EXTERNAL_REST_SERVICES_PROXY_PASSWORD | Password for authentication on the proxy. |
| TOKEN_SERVER_ENGINE_EXTERNAL_REST_SERVICES_PROXY_SCHEMA | Schema of the proxy (default is http). |
| TOKEN_SERVER_ENGINE_EXTERNAL_REST_SERVICES_PROXY_HOST | Hostname of the proxy. |
| TOKEN_SERVER_ENGINE_EXTERNAL_REST_SERVICES_PROXY_PORT | Port of the proxy (default is 8080). |
Configure SMS authentication
SMS authentication only consists of a single process called authorization. This process needs to be enabled to send out SMS messages to users.
A prerequisite is that a SMS gateway is configured in the technical configuration of the application by setting a Docker Compose environment variable
TOKEN_SERVER_ENGINE_CUSTOM_HOOKS_SMS_GATEWAY. As the SMS gateway the implementation corresponding to the
used SMS service provider should be used, by default Twilio is used.
To do the actual SMS authentication mobile authentication types for SMS have to be configured
Configure access via the API to initiate mobile authentication
Mobile authentication can be initiated via a REST API. So mobile authentication can be integrated with another application like a portal or resource gateway.
Mobile authentication API version 2 is protected by oauth credentials (see more information here). The unprotected API version 1 can be used if and only it is enabled with a Docker Compose environment variable (see more information here).
We strongly recommend to protect the authentication API by infrastructural measures like an IP whitelist, especially if using the deprecated API is enabled. The following endpoint for deprecated API must be a part of that IP whitelist:
/oauth/authenticate/user/{user_id} (in API version 2 this endpoint is /oauth/api/v2/authenticate/user).
Details about the API can be found in the mobile authentication api reference.
Configure mobile authentication types
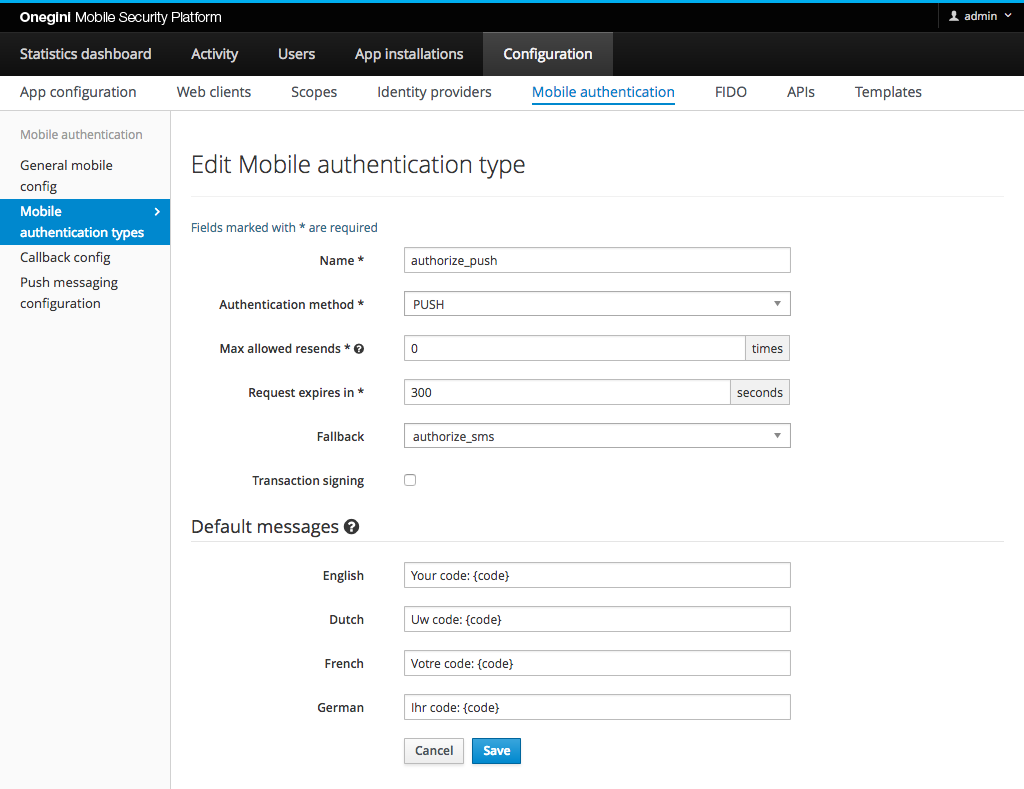
The mobile section of the admin panel contains a Mobile authentication types tab. In this tab you can manage different types of authentication.
Each mobile authentication type has a unique name which is used as an identifier. The authorization method defines the method that will be used. Examples include push, push with PIN, push with fingerprint, OTP, and SMS. Depending on the selected method some configuration fields will be hidden or displayed.
An authentication transaction has a limited time to live, specified in seconds. This value determines how long the user has to answer a mobile authentication request, from the moment the request has been initialized by the portal. For authentication methods where a user has multiple attempts to enter a code (e.g. SMS or push with PIN), all the attempts need to take place within the specified time to live of the mobile authentication type.
A different mobile authentication type can be specified as a fallback. The fallback is used when the originally requested mobile authentication request can not be initialized. For example, a mobile authentication type with method push may be configured to use SMS as fallback. In the event that the user has not enrolled any applications for push authentication, the Token Server will not be able to send a push notification. Instead, it will start SMS authentication.
Default messages can be configured in case no message was provided via the API. If no default message is specified for the requested language, the English default
message is used. Default messages can be configured for specific language codes. In order to support more languages than the default the following Docker Compose environment variable needs to be changed
TOKEN_SERVER_ADMIN_GENERAL_SUPPORTED_LOCALES.
For all types of mobile authentication except SMS, a user must have completed key enrollment with the Token Server.
Push
To receive push messages, a user must be enrolled for push, in addition to having keys enrolled. For regular push no refresh token or access token is required for the user, only an enrolled application.
Push with PIN
Push with PIN requires the user to have a refresh token. Therefore the application used must have
REFRESH_TOKEN configured as an allowed function. In this application config also the max allowed PIN
attempts must be configured. So when a user receives a push with PIN request for this application the user is disconnected after the max number of attempts is exceeded.
Push with fingerprint
A push with fingerprint mobile authentication request can be approved by a valid fingerprint or by a valid PIN. If a user does not have a fingerprint configured or the
device does not support it, the PIN can be used. There is no need to configure push with PIN as a fallback for this scenario.
The idea behind this is that the PIN mechanism is more secure than the fingerprint authentication. Therefore the PIN can be always used as a fallback in this case.
In order to enable fingerprint authentication for an application it must have the FINGERPRINT allowed function.
Push with FIDO
A push with FIDO transaction can be approved by a completing FIDO authentication or by using a valid PIN. If a user does not have a FIDO authenticator configured or the device does not support it, the PIN can be used. There is no need to configure push with PIN as a fallback for this scenario. The idea behind this is that the PIN mechanism is always available, while not all devices support FIDO authentication. Therefore the PIN can be always used as a fallback in this case. In order to enable FIDO authentication for an application it must have configuration for the FIDO authenticator.
OTP
For OTP authentication, the user's application obtains an OTP (One Time Password) directly from the portal. For example, after having initialized a mobile authentication request (without specifying the user), the web portal may display a QR code that the user can scan using their app. The OTP is then used to link the user's unauthenticated session on the portal to the authenticated session in the app. To configure an OTP authentication type, only the name, OTP type, and a time to live need to be specified. Fallback is not supported for OTP.
SMS
For SMS based authentication the maximum number of attempts has to be specified. When this value is 0 the
user can try unlimited codes. When the maximum is set, the transaction is invalidated when the maximum is exceeded.
With SMS authentication the user will receive a six digit code, this code is included in the message. In both the message provided via the api and the
default messages. A placeholder must be included to indicate where the code should be inserted in the message. The placeholder to be used is {code}. An example SMS
message: Your example SMS code: {code}.
In the Max allowed resends field you can specify how many times it is allowed to send the same verification code again (value 0 means that resending is disabled).
Configuration for Callback endpoints
The configuration for Callback endpoints serves two purposes:
- Whitelisting: if the callback URL whitelist is enabled in the Mobile config, the push authentication will only succeed for those URLs that are allowed.
- Authentication: configuration of the credentials for basic authentication on the callback endpoint.
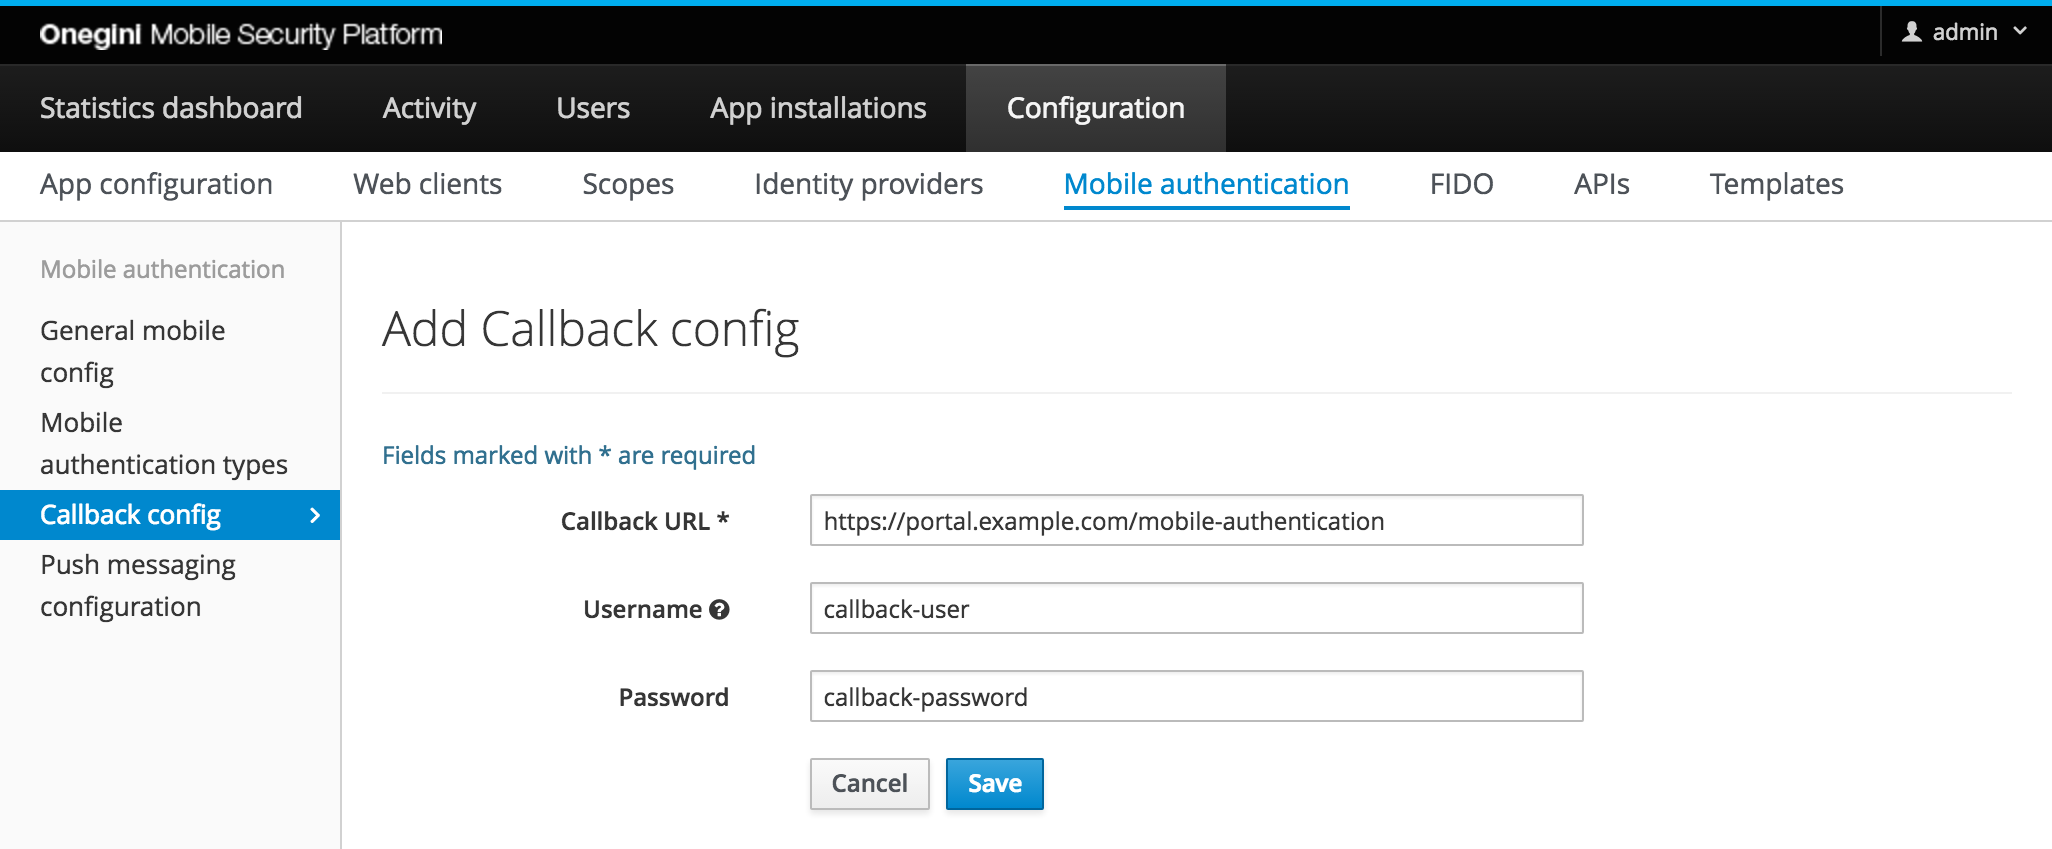
| Field | Required | Description |
|---|---|---|
| Callback URL | yes | URL that is used for the callback of mobile authentication. Must match exactly with the requested callback URL. |
| Username | no | Optional username for basic authentication when calling the Callback URL. |
| Password | no | Optional password for basic authentication when calling the Callback URL. |